Setting Windows 7 environment variables
This chapter excerpt can teach you how to use Windows 7 environmental variables to locate your customers' system files and folders.
This chapter excerpt helps solutions providers learn how to use Windows 7 environmental variables to locate system files and folders that affect customers' program operations and system performance.
Setting Environment Variables
Using environment variables is one of the ways that Windows communicates information such as the location of system files and folders -- as set up on your particular computer -- to programs. Environment variables indicate where temporary files are stored, what folders contain Windows program files, and other settings that affect program operation and system performance. In addition, they can be used in batch files to temporarily hold information about the job at hand.
In Windows 7, the initial environment variables that are defined when every Command Prompt window is first opened are set up using the GUI shown in Figure 29.2.
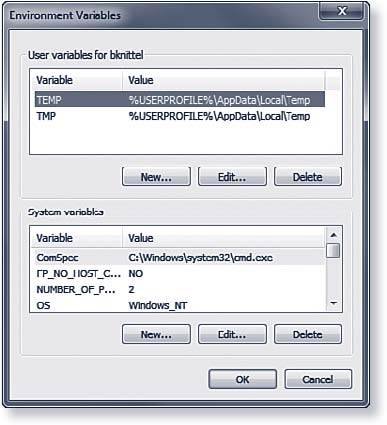
Figure 29.2
Examining the environment variables for the current user (top) and for all users of the system (bottom). The per-user list adds to or overrides the systemwide list.
Notice that this dialog box has two sections, System Variables and User Variables. The lower, System Variables section defines the environment variables set up for every user account. The upper, User Variables section defines additional default environment variables just for the current user account. These add to or override the variables set up in the systemwide list.
To open this dialog box, if you are a computer administrator user, use either of these two methods:
- If you have a Command Prompt window open, type the command start sysdm.cpl and press Enter. You might need to confirm a UAC prompt. Then, select the Advanced tab, and click the Environment Variables button.
- Alternatively, click Start, right-click Computer, and select Properties. Select Advanced System Settings. You might need to confirm a UAC prompt. Then, click the Environment Variables button.
You can now edit both the upper User Variables (personal settings) and lower System Variables (systemwide settings) lists.
If you are not a computer administrator user, it's a bit trickier. Use either of these two procedures:
- To edit the systemwide settings, you can use either of the preceding methods, but you'll have to supply an administrator password. Don't change the upper (personal) part of the dialog box -- you will be changing settings for the wrong account.
- To edit your own personal environment variable list, you must use the following method: Click Start, Control Panel, User Accounts and Family Safety, User Accounts. In the task list at the left side, click Change My Environment Variables. You will be able to edit only the upper (personal) environment variable list.
After you have the dialog box open, you can create new variables, delete variables, or highlight and edit existing variables using the corresponding buttons.
More on Windows for IT solution providers
Windows 8 upgrade rationale for customers
Windows Phone potential for business users
VDI and Windows Server 2012
If you need to alter a variable, you must understand what happens if there's a conflict between environment variables defined in both the System Variables and User Variables lists. As a rule, Windows examines several locations for definitions, and the last definition seen wins. Windows sets variables from the following sources, in this order:
1. The systemwide variable list.
2. The personal variable list. (At this step, the PATH variable is treated specially. See the next section for details.)
3. Set commands in autoexec.nt. (This applies only for MS-DOS or Windows 3.x applications. See "The MS-DOS Environment" later in the chapter for more information.)
4. Subsequent definitions issued by set commands typed in a Command Prompt window or encountered in a batch file. These changes apply only to that particular window and will disappear when the window is closed.
Setting the PATH Environment Variable
If you write batch files or scripts, it's useful to put them into one folder, and to add this folder name to the PATH variable, so that you can run your batch files and scripts simply by typing their names.
Because mis-editing the PATH variable can prevent Windows from finding applications it needs to run, Windows gives the "personal" PATH definition special treatment:
- For the PATH variable, the User Variables definition is added to the end of (appended to) the System Variables definition.
- For all other environment variables, a User Variables definition overrides a System Variables definition.
In other words, you can enter your own personal folder(s) into the User Variables definition of PATH without worrying about copying or messing up the system definitions.
To create a folder for your own scripts and batch files, use one of these two procedures:
-
If you want to use the scripts and batch files only for your own use, create a folder, and put the full path to the folder into your "personal" PATH variable. For example, create a folder named c:scripts.
Then, add a PATH variable to the upper part of the Environment Variables dialog box (refer to Figure 29.2) with the value c:scripts. If you need to add more than one folder to your personal PATH, put a semicolon (;) between each folder name.
-
If you want to create scripts and batch files that can be used by anyone who uses your computer, create a folder and be sure that its permissions are set so that all users can read it.
For example, create a folder named c:scripts. Right-click the folder, select Properties, and select the Security tab. If Users does not appear under Group or User Names, click Edit, then Add, and add "Users" to the list. Be sure that the Read & Execute permission setting is checked.
To learn more about editing file and folder permissions, see "NTFS File Permissions," p. 903.
Then, carefully edit the PATH variable in the lower part of the Environment Variables dialog box (shown in Figure 29.2). Add a semicolon (;) to the end of the existing text, and then add the folder name c:scripts.
Your folder now will be part of the PATH when you open a new Command Prompt window.
The MS-DOS Environment
If you still use MS-DOS programs, you'll be glad to know that the 32-bit versions of Windows 7 still support MS-DOS programs.
NOTE
The MS-DOS and 16-bit Windows subsystems are not provided with the 64-bit versions of Windows. If you use a 64-bit version of Windows 7 and still need to run MS-DOS or Windows 3.1 applications, you can download and install the free Microsoft Virtual PC program from microsoft.com, or use VMware from www.vmware.com. With either of these programs, you can set up a "virtual" computer, install a copy of MS-DOS, Windows 3.1, or any subsequent version of Windows, and run your older applications inside the simulated environment.
About the book
This chapter excerpt on Command-Line and Automation Tools (download PDF) is taken from the book Microsoft Windows 7 In Depth. The book has information on various Windows 7 topics, including installing and upgrading Windows 7, multimedia and imaging, networking, maintenance and security.
Be sure to install Virtual PC's "Guest Extensions" inside the hosted operating system -- these provide important enhancements. For example, they allow you to cut and paste between programs running inside and outside the virtual computer. This isn't quite as effortless as the built-in support provided by 32-bit versions of Windows, but it works very well.
If you have Windows 7 Professional, Ultimate, or Enterprise edition, you might also be able to use MS-DOS applications installed in the Virtual XP system, which is a free download you can get from Microsoft.
Windows 7 and all other versions of Windows based on Windows NT run MS-DOS applications inside a program called ntvdm, which stands for Windows NT Virtual DOS Machine. Ntvdm is also used by the Windows 3.x support environment. It simulates the environment that DOS programs expect and makes them work correctly under Windows.
Ntvdm runs automatically when you attempt to start an MS-DOS or 16-bit Windows program. You don't have to take any special steps to activate it, but you can tune it in several ways by doing the following:
- Configure user variables in the Environment Variables dialog box, as discussed in the section "Setting Environment Variables" earlier in the chapter.
- Make selections from the DOS window's control menu.
- Make settings in the Properties dialog box for a shortcut to the DOS application.
- Set up custom autoexec.nt and config.nt configuration files so that you can address special memory, driver, or environment variable requirements a DOS program might have.
- Enter environment-altering commands at the command prompt.
I discuss these settings in the next several sections.
For more information about virtual PCs, see "Taking the Virtual Machine Approach," p. 72.
For more information about The Virtual XP system, see Appendix A, "Using Virtualization on Windows 7."
Troubleshooting
MS-DOS App Says Too Many Files Open
If you run an MS-DOS application and it gives an error message saying there are too many files open, you must modify config.nt (or create a custom config file). You should change the line that reads, for example, files = 40 to a larger number; for example, files = 100. See "Customizing Autoexec.nt and Config.nt," later in this chapter, for instructions on modifying config.nt.
MS-DOS Application Displays Strange Characters
If your older MS-DOS application displays lots of strange characters on the screen, especially the combination ◊[, your program expected the support of a display driver called ansi.sys. You need to add the following line to your config.nt file, using the instructions under "Customizing Autoexec.nt and Config.nt" later in the chapter:
device=ansi.sys
Editing Advanced Settings for a DOS Application
If you're experiencing difficulties while running a specific DOS program, you can fine-tune the VDM environment for the particular application, allowing it to run more smoothly, or in some cases simply allowing it to run at all. DOS property settings can affect many aspects of an application's operation, such as (but not limited to) the following:
- The drive and folder (directory) selected as the default when an application starts
- Full-screen or windowed operation upon launch
- Conventional memory usage
- Expanded or extended memory usage
- The application's multitasking priority level
- The application's shortcut keys
- Foreground and background processing
NOTE
If the program is stored on an NTFS-formatted partition, the standard Security tab will also be listed in the Properties dialog box.
To edit these properties for a DOS program, do the following:
1. Find the program file or a shortcut to it.
2. Right-click and choose Properties.
Poke through each tab, and use the ? (question mark) button for help on the settings. Educational and game programs will most often require you to adjust the Memory and Compatibility settings.
TIP
The Screen tab's Usage options determine whether the application initially comes up windowed or full screen. You still can toggle between views by pressing Alt+Enter. Of course, in full-screen display, the mouse is surrendered to the application. When you use a mouse with a windowed application, the mouse works within the window on its menus, and with Windows when you move the mouse back to the Windows desktop. No DOS-based mouse driver is needed. Mouse support is provided automatically.
Customizing autoexec.nt and config.nt
You can choose to further configure the MS-DOS and Windows 3.x environment by modifying Windows 7's equivalent of the old CONFIG.SYS and AUTOEXEC.BAT files. These files are called config.nt and autoexec.nt and are used to configure each DOS VDM when it starts up. Just remember:
- The files CONFIG.SYS and autoexec.bat in your hard drive's root folder are completely ignored by Windows 7. If they're there at all, it's only to fool really old applications that won't run unless they see that these files exist.
- The files config.nt and autoexec.nt in windowssystem32 are used, but only when Windows needs to start up an MS-DOS or Windows 3.x application. Any change to these files will take effect the next time you start the application -- you don't need to restart Windows.
The standard settings in config.nt as set up when Windows is installed are shown in the following listing. The REM comments have been removed for brevity. (If you upgraded your computer from an earlier version of Windows, your config.nt file might be different because the installer might have retained some of your previous operating system's settings.)
dos=high, umb
device=%SystemRoot%system32himem.sys
files=40
You can edit the config.nt and autoexec.nt files with a simple text editor such as Notepad. They're protected files, however, so you must run an elevated version of Notepad, using this procedure:
1. Click Start, All Programs, Accessories.
2. Right-click Notepad and select Run As Administrator.
3. Confirm the UAC prompt, or enter an Administrator password as requested. (Alternately, you can just type notepad in an elevated Command Prompt window).
4. Click File, Open, and browse to windowssystem32. Select autoexec.nt or config.nt as desired.
TIP
On my computers, I always change the files setting to files=100 and add the line device=%SystemRoot% system32ansi.sys.
For more information about ansi.sys, see the next section.
Most of the settings used in MS-DOS 6 still work in config.nt, with some changes as noted in Table 29.2.
Table 29.2 Enhanced Settings for config.nt
|
|
|
| device= | Installs loadable device drivers. Drivers that attempt to address hardware directly likely won't work; however, you can load display drivers such as ANSI.SYS and memory managers such as EMM.SYS and HIMEM.SYS. |
| dosonly | Allows only DOS programs to be loaded from a COMMAND.COM prompt. Windows and UNIX programs won't run. |
| echoconfig | Tells the VDM to print CONFIG and AUTOEXEC commands as they are executed from the files. |
| files= | Sets the maximum number of open files. I recommend setting this to 100. |
| ntcmdprompt | Replaces the COMMAND.COM interpreter with the 32-bit Windows command interpreter, cmd.exe. After you load a TSR or when you shell out of an application to DOS, you will get cmd.exe instead, from which you have the added benefits of the full 32-bit interpreter. |
If you want, you can create customized copies of config.nt and/or autoexec.nt and use them just with specific DOS programs.
To do this:
1. Use an elevated copy of Notepad to create the new setting file(s) with different names. For example, you might save a modified config.nt as config_wordperfect.nt.
2. Locate the MS-DOS program's .exe or .com file icon in Windows Explorer.
3. Right-click the icon and select Properties. Select the Program tab, and click the Advanced button. Enter the path to your customized config file.
TIP
Editing these files properly is no piece of cake. I suggest you have at hand a good DOS reference, such as Que's Special Edition Using DOS 6.22, Third Edition. It's out of print, but you can get a used copy at www.abebooks.com, among other places.
Issues with DOSKEY and ANSI.SYS
Two of the most common enhancements used on MS-DOS computers were DOSKEY and ANSI.SYS. DOSKEY provided enhanced command-line editing: for example, the use of the up and down arrow keys to recall previous commands. ANSI.SYS gave DOS applications a way to easily control the position and color of text output onto the screen.
NOTE
If you make changes to autoexec.nt or config.nt after having run an MS-DOS program from a Command Prompt window, you must close the Command Prompt window and open a new one for the MS-DOS subsystem to reload and take on the new configuration.
ANSI.SYS can be made available for MS-DOS programs simply by adding the line device=ansi.sys to config.nt (or an alternate config file). Unfortunately, no ANSI cursor support is provided for 32-bit Windows character mode (console) applications.
Conversely, DOSKEY -- which has been enhanced significantly from the old DOS days -- functions only in the 32-bit Windows console environment, and even if you attempt to load it in autoexec.nt, it does not function within the MS-DOS COMMAND.COM shell.
Windows 7 command-line and automation tools
Windows 7 command-line tools and programs
Setting Windows 7 environment variables
Printed with permission from Que Publishing. Copyright 2009. Windows 7 In Depth by Robert Cowart and Brian Knittel. For more information about this title and other similar books, please visit Que Publishing.
About the authors:
Robert Cowart has written for PC Week, Mac World, A+, PC World and Microsoft Systems Journal. Cowart has authored 32 books and has written more Windows books than any other author. He has taken part in the PBS TV series Computer Chronicles and has several bestseller books, including Windows NT 4 Unleashed.
Brian Knittel is a software developer, consultant and writer that specializes in document conversion and networking. Knittel studied at the University of California at Berkeley and co-wrote Special Edition Using Microsoft Windows 2000 Professional and Special Edition Using Microsoft Windows XP Home Edition.