Linux operating system
What is Linux?
Linux is a Unix-like, open source and community-developed operating system (OS) for computers, servers, mainframes, mobile devices and embedded devices. It is supported on almost every major computer platform, including x86, ARM and SPARC, making it one of the most widely supported operating systems.
How is the Linux operating system used?
Every version of the Linux OS manages hardware resources, launches and handles applications, and provides some form of user interface. The enormous community for developers and wide range of distributions means that a Linux version is available for almost any task, and Linux has penetrated many areas of computing.
For example, Linux has emerged as a popular OS for web servers such as Apache, as well as for network operations, scientific computing tasks that require huge compute clusters, running databases, desktop and endpoint computing, and running mobile devices with OS versions like Android.
The Linux OS can be found in many different settings, supporting many different use cases. Linux is used in the following ways:
- Server OS for web servers, database servers, file servers, email servers and any other type of shared server. Designed to support high-volume and multithreading applications, Linux is well-suited for all types of server applications.
- Desktop OS for personal productivity computing. Linux is an open source and freely available desktop environment for users who prefer it to commercial OSes.
- Headless server OS for systems that do not require a graphical user interface (GUI) or directly connected terminal and keyboard. Headless systems are often used for remotely managed networking server and other devices.
- Embedded device or appliance OS for systems that require limited computing function. Linux is used as an embedded OS for a variety of applications, including household appliances, automotive entertainment systems and network file system appliances.
- Network OS for routers, switches, domain name system servers, home networking devices and more. For example, Cisco offers a version of the Cisco Internetwork Operating System (IOS) that uses the Linux kernel.
- Software development OS for enterprise software development. Although many development tools have been ported to Windows or other OSes, Linux is home to some of the most widely used open source software development tools. For example, git for distributed source control; vim and emacs for source code editing; and compilers and interpreters for almost every programming language.
- Cloud OS for cloud instances. Major cloud computing providers offer access to cloud computing instances running Linux for cloud servers, desktops and other services.
Linux is highly configurable and depends on a modular design that enables users to customize their own versions of Linux. Depending on the application, Linux can be optimized for different purposes such as:
- networking performance;
- computation performance;
- deployment on specific hardware platforms; and
- deployment on systems with limited memory, storage or computing resources.
Users can choose different Linux distributions for specific applications or adapt a specific distribution to incorporate custom kernel configurations.
Linux distributions
Since its initial development, Linux has adopted the copyleft stipulations of the Free Software Foundation which originated the GNU GPL. The GPL says that anything taken for free and modified must be distributed for free. In practice, if Linux or other GNU-licensed components are developed or modified to create a new version of Linux, that new version must be distributed for free. This prevents a developer or other groups from profiting unfairly from the freely available work of others.

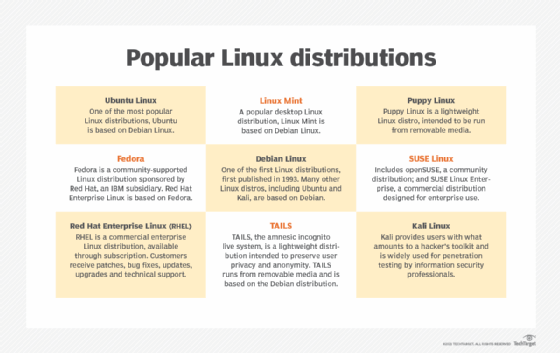
Hundreds of different Linux versions, also known as distributions or distros, are available. Distributions usually distinguish themselves from the pack by addressing a specific goal, philosophy, function or target market.
There are distributions tailored for specific target functions, such as servers, desktops, gaming, security, or embedded devices including Raspberry Pi systems. Most modern distributions are precompiled and ready to use, while others like Gentoo Linux consist of source code that a user can compile locally during initial installation to optimize their system configuration. Knoppix Linux is one of many distros used to recover damaged hard drives and perform other technical support tasks. Information security professionals use Kali Linux for penetration testing and other security-related tasks.
Linux has become an important component of automaker entertainment systems. Many automakers have joined Automotive Grade Linux (AGL), an open source project hosted by the Linux Foundation. For example, Toyota and Lexus vehicles use AGL for their infotainment systems.
Linux distributions may be community-developed, like Debian, Slackware and Gentoo. Other distributions are commercial and intended for enterprise use, including Red Hat Enterprise Linux and SUSE Linux Enterprise Server. Many distributions use a combination of community- and corporate-supported development, such as Red Hat's Fedora, openSUSE from SUSE and Ubuntu from Canonical.
The GNU GPL does not prohibit intellectual ownership, and it is commonplace for creators of Linux components to hold copyrights on the various components. The GNU GPL ensures that those components remain free and freely distributed. While the software remains free, it is common for some commercial distributions to charge for value-added services, such as support or custom development services.
Linux components and terminology
The Linux OS system incorporates several different components, including:
- Bootloader. A bootloader is responsible for managing the boot process of the computer and for starting the Linux kernel. It can also be used to manage systems that boot more than one OS.
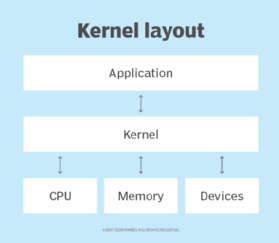
- Kernel. The core of the Linux system, the kernel handles network access, schedules processes or applications, manages basic peripheral devices and oversees all file system services. The Linux kernel is the software that interfaces directly with the computer hardware.
- Init system. The first process to run once the kernel is loaded. A process is an instance of a program running on a computer, and the init system initializes the system to enable it to run other processes. Init is a daemon program that acts as the parent process to all other processes running on the system. Init can be configured to start specific processes at system initialization. For example, when the system will be running a web server the init system can be configured to load all necessary web server software.
- Daemons. This is a program that runs in the background, handling requests for a service. A web server running on a Linux server depends on a daemon, usually named httpd, to listen for web server requests.
- Graphical server. This is the software that controls how graphics are displayed on a computer. Without a graphical server, users can only interact with the Linux system through a command-line interface. The X Window System, also known as X11 or X, is the most common graphical server for Linux, though not the only one. X runs as a server daemon on the system and is called upon by applications when graphical output is required.
- Desktop environment. This is the collection of applications and user interface controls with which users interact when using Linux as a desktop platform. Access to the desktop environment is usually controlled through the X Window System or another graphical system. Each desktop environment defines its own look, including the way graphical elements like windows, pull-down menus and files are displayed and manipulated. The desktop environment will also include a set of default applications for managing files and folders, text editing, running a command-line session and other common tasks.
- Applications. This is the software that is installed during and after the initial Linux installation. Most Linux distributions include thousands of different applications, including both for a networked server and for desktop use.
While these components are included in most Linux distributions, they are not necessarily part of every deployed Linux system. For example, a Linux-based server may not require a graphical server, desktop environment or applications.
But it is really the many outside developers and GNU projects that offer high-level functions to the Linux kernel to provide a fully realized OS. For example, there are modules to provide a command-line interface, implement a GUI, manage security, and offer video input or audio services -- each of which can be modified and optimized to form unique distributions for specific tasks.
Desktop environments can also vary widely with different approaches to GUI design and default applications. The two most popular desktop environments are:
- The GNOME desktop environment, which is included in most popular Linux distributions, is the default desktop for many. Designed to be easy to use and reliable, GNOME spawned other desktop environment projects, including MATE, Cinnamon and Unity.
- The KDE desktop environment is the primary alternative to GNOME. KDE is also designed to be easy to use and reliable. It has spawned other projects, including the Trinity Desktop Environment.
Package manager software typically adds, updates or removes software components under the Linux OS. Package managers enable users to install additional software not included with their distributions. Examples of software package managers include RPM Package Manager, dpkg, OpenPKG and Zero Install.
How the Linux operating system works
The Linux OS follows a modular design that is the key to its many variations and distributions. All Linux distributions are based on the Linux kernel, but they can differ depending on factors such as:
- Kernel version. Distributions can be configured with more recent versions to incorporate newer features or with older versions to be more stable.
- Kernel modules. This is software that can be loaded and unloaded into the kernel to extend functionality without rebooting. Kernel modules are often used to support:
- device drivers, which use code that controls how attached devices operate;
- file system drivers, which use code that controls how the kernel works with different file systems; and
- system calls, which use code that controls how programs request services from the kernel.
- Configuration options. Linux kernels compiled with configuration options set to include only device or file system drivers are used for some specialized distributions; for example, compiling a kernel for a wireless device without any wired network device drivers.
The Linux kernel is the one thing that all systems running Linux have in common. Linux works by:
- Loading and booting a Linux kernel.
- Once booted, the kernel manages all system input and output. The system is initialized, and processes can be started.
- As system processes are started, the system can be used for processes that include network server functions, commands entered interactively via command line, desktop applications or any application or program.
While the kernel may be almost identical -- with some divergence for configuration and compilation differences -- the user experience can vary widely, depending on how the Linux system is being used. For example, some Linux use cases with widely different user experiences include:
- Desktop productivity systems, such as those used by software developers or other professionals. Software development workstations may be optimized for performance, while desktops for administrative professionals may be optimized for use of desktop productivity tools.
- Network servers may not even include a terminal for direct access. These headless servers are managed remotely through network terminal or Windows sessions. Servers may be used by many but should be directly accessed only by authorized system admins.
- Thin clients enable users to access a rich desktop environment from a lightweight device. This includes Raspberry Pi single-card computers and Google Chromebooks.
When using Linux with a desktop environment as a GUI, Linux works much the same as any GUI-based OS. Applications and other resources can be opened by clicking on icons, and files can be moved, copied or deleted using a mouse or trackpad.
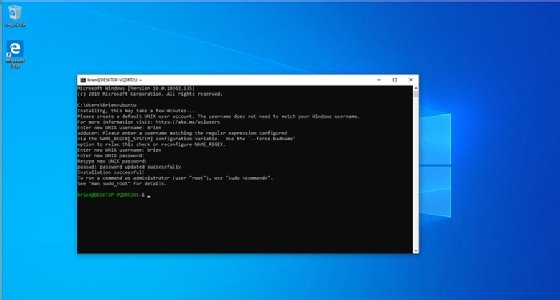
Likewise, using the Linux command line is similar to any modern OS command line:
userID@DESKTOP-2KD3FT2:/mnt/c/WINDOWS/system32$
This example shows the default command prompt in the Windows Subsystem for Linux. The prompt displays, from left to right, userID@hostname, and the full path of the current directory followed by the "$" symbol.
The pros and cons of using Linux
Some advantages of using Linux include:
- Open source software. The Linux kernel is released under the GNU GPL open source software license. Most distros include hundreds of applications, with many options in almost every category. Many distributions also include proprietary software, such as device drivers provided by manufacturers, to support their hardware.
- Licensing costs. Unlike Microsoft Windows or Apple macOS, Linux has no explicit licensing fees. While system support is available for a fee from many Linux vendors, the OS itself is free to copy and use. Some IT organizations have increased their savings by switching their server software from a commercial OS to Linux.
- Reliability. Linux is considered a reliable OS and is well-supported with security patches. Linux is also considered to be stable, meaning it can run in most circumstances. Linux also copes with errors when running software and unexpected input.
- Backward compatibility. Linux and other open source software tend to be updated frequently for security and functional patches, while retaining core functionality. Configurations and shell scripts are likely to work unchanged even when software updates are applied. Unlike commercial software vendors that roll out new versions of their OSes along with new ways to work, Linux and open source applications generally don't change their modes of operation with new releases.
- Many choices. Between the hundreds of available distributions, thousands of applications and almost infinite options for configuring, compiling and running Linux on almost any hardware platform, it is possible to optimize Linux for almost any application.
Some disadvantages of using Linux include:
- Lack of established standard. There is no standard version of Linux, which may be good for optimizing Linux for particular applications, but less so for deploying standardized server or desktop images. The wide range of options can complicate support as a result.
- Support costs. While an organization can acquire Linux freely without licensing fees, support is not free. Most enterprise Linux distributors like SUSE and Red Hat offer support contracts. Depending on the circumstances, these license fees can reduce savings significantly.
- Proprietary software. Desktop productivity software like Microsoft Office cannot be used on Linux desktops, and other proprietary software may be unavailable for Linux platforms.
- Unsupported hardware. While many hardware manufacturers make Linux device drivers available for their products, many do not.
- Steep learning curve. Many users struggle to learn to use the Linux desktop or Linux-based applications.
In some cases, the same Linux attribute can be either an advantage or disadvantage. For example, having many options for customizing the Linux OS is advantageous for manufacturers looking for an embedded OS, but it is a disadvantage for enterprises that want a desktop OS that can be used by a wide range of end users.
History of Linux
Linus Torvalds started working on Linux as a replacement to the Minix OS while at the University of Helsinki in Finland. Torvalds recognized the work done on the GNU Project in 1983, which intended to create a complete, Unix-compatible OS comprised entirely of free software, and noted the GNU as a model for distribution. However, the work on GNU had not been finished by the time Torvalds sought a Minix replacement, prompting him to develop an alternate OS kernel dubbed Linux -- a contraction of Linus' Unix -- and adopt the GNU GPL.
Torvalds released the Linux kernel in September 1991. A community of developers worked to integrate GNU components with Torvalds' kernel to create a complete, free OS known collectively as Linux. Torvalds continues to develop the Linux kernel and a vast developer community continues to create and integrate a wide range of components.
While Linux still lags Windows and macOS on the desktop, it continues to challenge the proprietary OS vendors on servers and embedded systems.
To find out more about the Linux experience, read how Windows systems administrators can gain new skills working with Linux.