Cloning virtual machines in vCenter Server
Learn how to identify and clone virtual machines in vCenter Server, from the parameter selection in vSphere 5 to the actual steps to creating the clone.
In VMware vCenter Server, cloning virtual machines can help VARs, MSPs and their customers test new software and rapidly scale up a production environment.
This section of Chapter 7 from VCP5 VMware Certified Professional on vSphere 5 Study Guide: Exam VCP-510 from John Wiley and Sons Inc. is designed to help vSphere 5 admins understand what virtual machines (VMs) can be cloned. It also provides the specific steps for creating a VM clone.
More on vSphere 5
Five steps for optimizing vSphere performance in the cloud
A beginner's guide to VMware vSphere
Considering a VMware vSphere 5 upgrade
Identifying Cloning and Template Options
Cloning in vCenter Server is the process of creating an exact copy of a virtual machine, including the virtual hardware and the guest OS. A clone can be taken of a powered-on or powered-off virtual machine. Clones are often useful for testing purposes. For example, a production server could be cloned while online, and then the clone could be used in a test environment. The cloned virtual machine is its own virtual machine and in no way depends on the original.
A virtual machine can also be converted to a template in vCenter Server, and once converted, the templates cannot be powered on or have their configurations changed. Templates can be used in vCenter Server to provide simplified provisioning of virtual machines. A typical use for templates is to set up a master image of a frequently deployed server operating system, for example Windows Server 2008 R2. This virtual machine can be modified to form a standard build for your environment, and then all future Windows Server 2008 R2 servers can be deployed from this virtual machine template. An additional feature of deployment from a template is the ability to customize the guest operating system. Using templates both simplifies builds and nearly eliminates mistakes in the process.
Many different options can be specified during either a clone operation or when deploying from a template:
- You can select a data center.
- You can select a cluster or an ESXi host.
- You can select a resource pool.
- You can select a virtual disk format.
- You can select a data store.
- You can select a storage profile.
- You can select whether to disable Storage DRS.
- You can select whether to customize the guest OS.
- You can select whether to power on the VM after creation.
Both vCenter Server and the vSphere Client are required to use cloning and templates.
Now that I have identified cloning and template options, I will cover each in more detail.
First, I will cover cloning an existing virtual machine.
Cloning an Existing Virtual Machine
In Exercise 7.1, you will use the vSphere Client to clone an existing Windows Server 2008 R2 virtual machine. For the purpose of the exercise, I will assume that this Windows Server 2008 R2 virtual machine is your master image that is used for deploying new virtual machines.
EXERCISE 7.1
Cloning an Existing Virtual Machine
- Connect to a vCenter Server with the vSphere Client.
- Locate the virtual machine and right-click it. Select the Clone option from the context menu that appears. The Clone Virtual Machine Wizard will launch.
- Provide the new virtual machine with a unique name and choose an inventory location. Click Next.
- Choose the host or cluster that will be used to run the virtual machine. Review any issues reported in the Compatibility window before proceeding. Click Next.
- If your environment has resource pools, pick a resource pool. Click Next.
- Using the drop-down menu, select a virtual disk format for the cloned virtual machine. By default, the selection is Same Format As Source. Choose a data store to store the virtual machine on. Click Next.
- On the Guest Customization screen, leave the Power On This Virtual Machine After Creation option unchecked. This will give you the chance to review and modify the virtual hardware settings after the clone completes.
- Select the Customize Using The Customization Wizard option and click Next.
Choosing the Do Not Customize option would clone the virtual machine, creating an exact replica of it. The Customize Using An Existing Customization Specification option could be used, if there were an existing customization specification available. The option chosen in step 8, Customize Using The Customization Wizard, will allow you to both customize the virtual machine and create a customization specification. You will use the customization specification you create in this exercise later in this chapter.
The vSphere Client Windows Guest Customization window will appear.

- Fill in the Name and Organization fields and click Next.
- Provide a NetBIOS computer name for the guest OS to use. You can also utilize the Use The Virtual Machine Name option here, if you want the computer name and the virtual machine names to match. Click Next to continue.
- Enter the Windows Product Key and choose the appropriate options for the Server License Mode. Click Next to continue.
- Provide the password for the local Windows Administrator account and confirm it. Click Next to continue.
- Select the time zone and click Next.
- Click Next on the Run Once screen.
- Choose the Typical Settings option for networking and click Next to continue.
- Fill in the Windows Server Domain or Workgroup fields appropriate for your environment. If you choose to add the guest OS on this virtual machine to the domain, you will need to provide a username and password of a user with authority to join machines to the domain. Click Next.
- Unless you have a very specific reason not to, leave the Generate New Security ID (SID) option checked and click Next to continue.
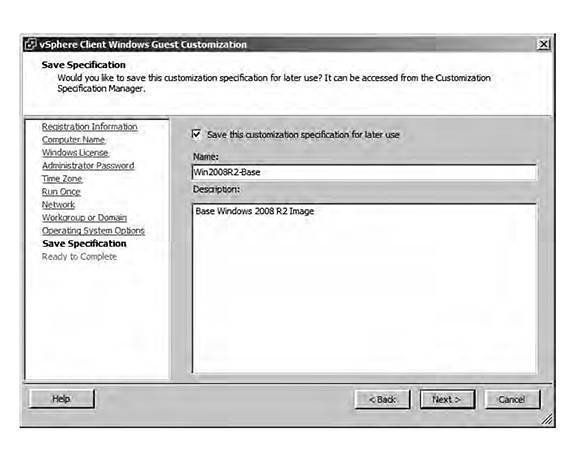
- Ensure that the Save This Customization Specification For Later Use box is selected.
Give the customization specification a unique name and a description. The final configuration should look like this.
- Click Next and review the information presented on the Ready To Complete Screen.
- Click Finish to save the customization specification information.
- On the Clone Virtual Machine screen, review the information presented on the Ready To Complete screen.
Note the Edit Virtual Hardware (Experimental) option on the Ready To Complete screen. Experimental options are those that may find their way into future versions of the product, but there is no guaranteed support from VMware for them. It is not recommended that you use experimental features on production systems.
- Click Finish to begin the clone process.
- A Clone Virtual Machine task will begin. When this task completes, locate the new virtual machine in the inventory. Right-click it and choose the Edit Settings option from the context menu. Verify the settings and power it on, if you want.
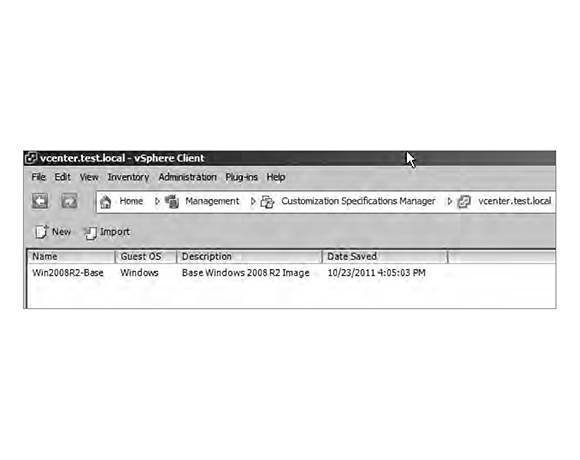
- On the vSphere navigation bar at the top of the screen, click the Home icon. Under the Management section, click the Customization Specifications Manager icon.
- The customization specification you saved in step 20 is listed here and should look like this.
- Right-click the customization specification and choose the Edit option from the context menu that appears, if you ever need to make changes to it.
You can also schedule clone operations using the Scheduled Tasks feature in vCenter Server.
I just covered cloning a virtual machine and how to use the customization specifications included in vCenter Server.
About the author
Brian Atkinson is a senior systems engineer with 15 years of experience in the IT field. For the past six years, he has been focused on virtualization and storage solutions. Brian has been awarded the VMware vExpert designation from VMware for 2009, 2010 and 2011. He is a VMware Technology Network (VMTN) moderator and guru.
Printed with permission from Sybex Inc., a John Wiley and Sons Imprint. Copyright May 2012. VCP5 VMware Certified Professional on vSphere 5 Study Guide: Exam VCP-510 by Brian Atkinson. For more information about this title and other similar books, please visit http://www.sybex.com/WileyCDA/.