IT Channel.com
Windows 7 virtual memory performance optimization
By null
No matter how much main memory your system boasts, Windows 7 still creates and uses a page file for virtual memory. To maximize page file performance, you should make sure that Windows 7 is working optimally with the page file. The next few sections present some techniques that help you do just that.
Storing the Page File Optimally
The location of the page file can have a major impact on its performance. There are three things you should consider:
- If you have multiple physical hard disks, store the page file on the hard disk that has the fastest access time -- You'll see later in this section that you can tell Windows 7 which hard disk to use for the page file.
- Store the page file on an uncompressed partition -- Windows 7 is happy to store the page file on a compressed NTFS partition. However, as with all file operations on a compressed partition, the performance of page file operations suffers because of the compression and decompression required. Therefore, you should store the page file on an uncompressed partition.
- If you have multiple hard disks, store the page file on the hard disk that has the most free space -- Windows 7 expands and contracts the page file dynamically depending on the system's needs. Storing the page file on the disk with the most space gives Windows 7 the most flexibility.
See "Changing the Paging File's Location and Size," later in this chapter, for the information about moving the page file.
About the book
This chapter excerpt on Tuning Windows 7's Performance (download PDF) is taken from the book Microsoft Windows 7 Unleashed. This book goes deep into Windows 7 and covers everything from security settings to startup optimization and networking. Author Paul McFedries introduces new styles and techniques to maximize your Windows 7 performance.
Splitting the Page File
If you have two or more physical drives (not just two or more partitions on a single physical drive), splitting the page file over each drive can improve performance because it means that Windows 7 can extract data from each drive's page file simultaneously. For example, if your current initial page file size is 384MB, you'd set up a page file on a drive with a 192MB initial size, and another page file on a second drive with a 192MB initial size.
See "Changing the Paging File's Location and Size" to learn how to split the page file.
Customizing the Page File Size
By default, Windows 7 sets the initial size of the page file to 1.5 times the amount of RAM in your system, and it sets the maximum size of the page file to 3 times the amount of RAM. For example, on a system with 1GB RAM, the page file's initial size will be 1.5GB and its maximum size will be 3GB. The default values work well on most systems, but you might want to customize these sizes to suit your own configuration. Here are some notes about custom page file sizes:
- The less RAM you have, the more likely it is that Windows 7 will use the page file, so the Windows 7 default page file sizes make sense. If your computer has less than 1GB RAM, you should leave the page file sizes as is.
- The more RAM you have, the less likely it is that Windows 7 will use the page file. Therefore, the default initial page file size is too large and the disk space reserved by Windows 7 is wasted. On systems with 2GB RAM or more, you should set the initial page file size to half the RAM size, but leave the maximum size at three times the amount of RAM, just in case.
- If disk space is at a premium and you can't move the page file to a drive with more free space, set the initial page file size to 16MB (the minimum size supported by Windows 7). This should eventually result in the smallest possible page file, but you'll see a bit of a performance drop because Windows 7 will often have to increase the size the page file dynamically as you work with your programs.
- You might think that setting the initial size and the maximum size to the same relatively large value (say, two or three times RAM) would improve performance because it would mean that Windows 7 would never resize the page file. In practice, however, it has been shown that this trick does not improve performance, and in some cases actually decreases performance.
- If you have a large amount of RAM (at least 2GB), you might think that Windows 7 would never need virtual memory, so it would be okay to turn off the page file. This won't work, however, because Windows 7 needs the page file anyway, and some programs might crash if no virtual memory is present.
See "Changing the Paging File's Location and Size" to learn how to customize the page file size.
Watching the Page File Size
Monitor the page file performance to get a feel for how it works under normal conditions, where normal means while running your usual collection of applications and your usual number of open windows and documents.
Start up all the programs you normally use (and perhaps a few extra, for good measure) and then watch Performance Monitor's ProcessPage File Bytes and ProcessPage File Bytes Peak counters.
About the author
Paul McFedries is the president of Logophilia Limited, a technical writing company, and has been writing computer books since 1991. McFedries is the author or coauthor of more than 60 books that have sold more than 3 million copies worldwide. He is also the proprietor of Wordspy.com, a website described as "the word lover's guide to new words," which tracks new words that become part of the English language.
Changing the Paging File's Location and Size
The page file is named Pagefile.sys and it's stored in the root folder of the %SystemDrive%. Here's how to change the hard disk that Windows 7 uses to store the page file as well as the page file sizes:
NOTE
The Pagefile.sys file is a hidden system file. To see it, open any folder window and select
Organize, Folder and Search Options. In the Folder Options dialog box, click the View tab, activate
the Show Hidden Files and Folders option, and deactivate the Hide Protected Operating System Files
check box. When Windows 7 asks you to confirm the display of protected operating system files,
click Yes, and then click OK.
- If necessary, defragment the hard disk that you'll be using for the page file, as described in Chapter 7. See "Defragmenting Your Hard Disk," p. 145.
- Select Start, type advanced system, and then press Enter to select View Advanced System Settings in the search results. This opens the System Properties dialog box with the Advanced tab displayed.
- In the Performance group, click Settings to display the Performance Options dialog box.
- In the Advanced tab's Virtual Memory group, click Change. Windows 7 displays the Virtual Memory dialog box.
- Deactivate the Automatically Manage Paging File Size for All Drives check box. Windows 7 enables the rest of the dialog box controls, as shown in Figure 6.8.
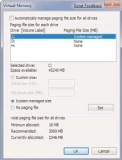
FIGURE 6.8 Use the Virtual Memory dialog box to select a different hard disk to store the page file.
- Use the Drive list to select the hard drive you want to use.
- Select a page file size option:
- Custom Size—Activate this option to set your own page file sizes using the Initial Size (MB) and Maximum Size (MB) text boxes. Ensure that Windows 7 is able to resize the page file dynamically, as needed, by entering a maximum size that's larger than the initial size.
- System Managed Size—Activate this option to let Windows 7 manage the page file sizes for you.
- No Paging File—Activate this option to disable the page file on the selected drive.

TIP
If you want to move the page file to another drive, first select the original drive and then
activate the No Paging File option to remove the page file from that drive. Select the other drive
and choose either Custom Size or System Managed Size to add a new page file to that drive.
TIP
If you want to split the page file over a second drive, leave the original drive as is, select the
second drive, and choose either Custom Size or System Managed Size to create a second page file on
that drive.
- Click Set.
Exit all the dialog boxes. If you changed the drive or decreased either the initial size or the maximum size, you need to restart your computer to put the changes into effect.
Printed with permission from Sams Publishing. Copyright 2009. Microsoft Windows 7 Unleashed by Paul McFedries. For more information about this title and other similar books, please visit www.pearson.com.
10 Sep 2009