IT Channel.com
Using the Ubuntu Linux system monitor tool
By null
Not everything is fun and games on your Ubuntu workstation. There are a few things you should do to help ensure that your system is running properly. There are also times when things go wrong. When that happens, it helps to know how to look at various parts of your system and see what's going on. This chapter walks through some of the basics of managing your Ubuntu workstation. It discusses how to use the simple utilities Ubuntu provides for interacting with your system and determining how it's doing.
|
||||
First we'll take a look at the System Monitor, which can provide some excellent information about what programs are running and how much of the system resources they're using. We'll then take a look at how Ubuntu uses log files to document when things go wrong on the system. Next, we'll look at a couple of utilities that Ubuntu provides for configuring which system services and applications run, both when your system starts and when you log into your desktop. Finally, we'll discuss the Disk Usage Analyzer tool, which allows you see where your disk space is going.
Monitoring the System
The best tool for administering your Ubuntu workstation is the System Monitor. Start the System Monitor by selecting System, Administration, System Monitor from the Panel menu. The System Monitor tool provides information about how the system hardware and software are working.
There are four window tabs of information in the System Monitor:
- System: Displays general information about the Ubuntu workstation.
- Processes: Shows real-time information about programs currently running on the system.
- Resources: Shows real-time information about CPU and memory usage.
- File Systems: Shows information about the hard drives that are mounted on the system.
Of course, just having a bunch of information thrown at you doesn't help at all. For that information to be useful, you need to know what it means. The following sections help you interpret the various pieces of information contained in the System Monitor.
System
The System tab provides an easy, one-stop-shopping location to find basic information about the system. There are three sections in the System tab:
- Ubuntu: Provides information on the version of Ubuntu installed, the Linux kernel version, and the GNOME desktop version.
- Hardware: Displays the processor type and the amount of physical memory installed in the system.
- System Status: Displays the amount of disk space available on the system.
Although not a major source of information, the System tab does provide some of the basic things you might be curious to know about your Ubuntu system, or might need to know if you stumble across another Ubuntu system and need to know what it's running.
Processes
|
||||
In the Linux world, processes are the programs running on the system. It often helps to know what processes are running on the Ubuntu system, especially because many of them run in background mode. Processes running in background mode don't appear on your desktop, so you have no way of knowing they're running. These programs perform most of the behind-the-scenes work, such as monitoring the battery level in your laptop and scheduling programs to run at specific times.
Clicking the Processes tab provides an overview of the programs currently running on the system, as shown in Figure 18-1.
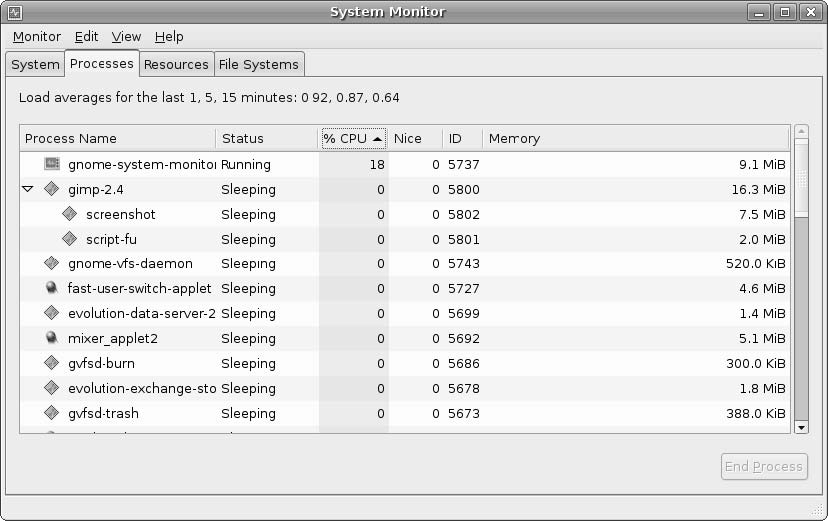
Figure 18-1: The Processes tab in the System Monitor tool.
Processes appear in a table format in the window display. The default view shows all processes currently being run by your user account. Alternatively, you can watch all of the processes running on the system, or just the ones that are actively working, by clicking the View menu item from the menu bar and selecting which option you want to view.
Selecting the Dependencies entry in the View menu reorders the process list to show which processes started which other processes. This option produces a drop-down tree, with parent processes at the top level and, below that, any child processes that the parent started. You can roll up the children processes and display only the parent processes by clicking the arrow icon next to the parent process.
You can sort the process rows in the list based on any of the table columns. For example, to see what processes are using the largest percentage of CPU time, click the % CPU column heading. The System Monitor automatically sorts the rows based on percentage of CPU usage. Clicking the column heading a second time reverses the order of the list.
You can customize the table by adding or removing data columns for the processes. Click Edit, Preferences with the Processes tab selected to see the options available for the Processes tab. Table 18-1 lists the data available to display in the Processes tab table.
There are also a few other options you can set while you're in the Properties dialog box of the Processes tab:
- Update Interval in Seconds: Specifies how frequently the System Monitor refreshes the process table data.
- Enable Smooth Refresh: Gathers new process information before refreshing the process table data, rather than refreshing table data as it gathers process information.
- Alert Before Ending or Killing Processes: Produces a warning that you are about to terminate a running process.
- Solaris Mode: Calculates the percentage of CPU utilization based on the number of active CPU cores. Thus, if two separate processes are maxing out two separate CPU cores, they would both show 50 percent CPU utilization instead of both showing 100 percent.
You can also control processes that you own from the Processes tab. Right-clicking a process produces a menu that allows you to stop, end, or kill a process, along with entries that allow you to change the priority of the process.
Secret: The System Monitor allows you to stop only the processes that you own. These are processes that your desktop started when you logged in and any programs or applets that you run from your desktop environment. Unfortunately, it doesn't tell you that. It'll allow you to select a process that you don't own and click the End Process button. However, the attempt to end a process you don't own will fail.
To stop system processes you must have administrative privileges (see Chapter 17, "Users and Groups").
Resources
Clicking the Resources tab provides a quick graphical overview of the hardware status of the system, as shown in Figure 18-2.
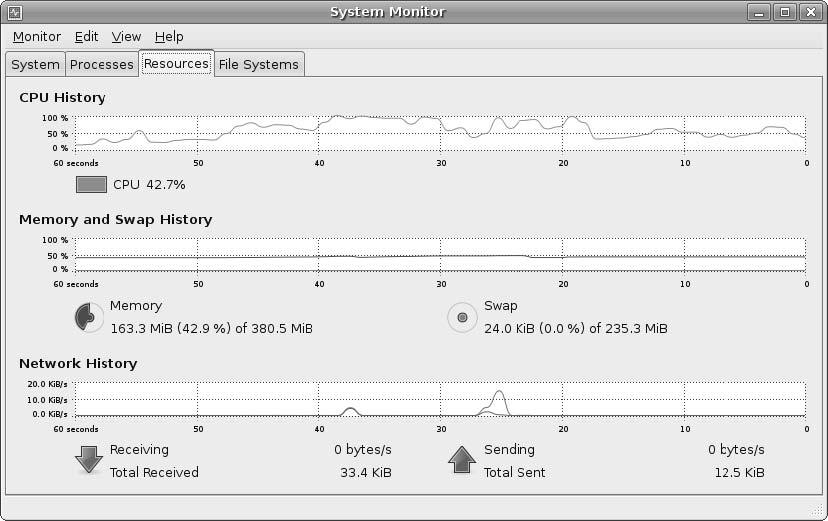
Figure 18-2: The Resources tab in the System Monitor tool.
There are three graphs displayed:
- CPU History: Displays the running real-time CPU percentage utilization. If the system contains more than one processor, each processor is shown as a separate history line.
- Memory and Swap History: Displays two running real-time graphs, one for the amount of memory used by the user and one for the amount of swap space used by the user.
- Network History: Displays the amount of data sent and received from the network interfaces.
Each graph displays the values for the last minute of operation, starting with the current time on the right side of the graph. The Resources tab can give you a quick overall picture of how your system is doing. If you see that the CPU or memory usage is running high, you can flip over to the Processes tab and sort the list based on that parameter.
Besides the graphical view, the Resources tab displays the current real-time information for each value, under the graph. The CPU History displays the current CPU load as a percentage of the CPU capacity. The Memory and Swap History displays the physical and swap memory areas used, as a pie chart icon. The more memory or swap space used, the more of the icon is filled. The Network History displays both the sent and received data on the network interfaces. It displays graphs of the current KB/s data flow on the network interfaces, as well as a numerical value of the total data sent and received since the system was started.
File Systems
Clicking the File Systems tab gives you a quick look at the amount of disk space used on each mounted filesystem, shown in Figure 18-3.
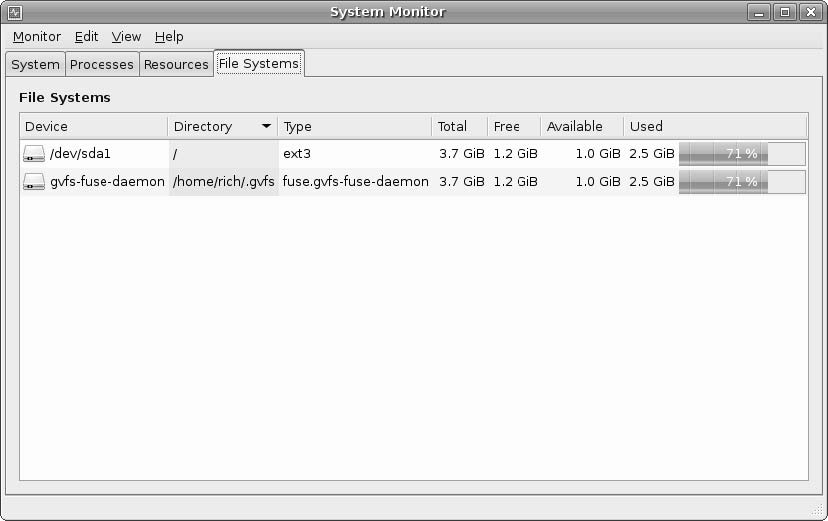
Figure 18-3: The File Systems tab in the System Monitor tool.
All hard drives and partitions mounted on the Ubuntu system are shown, along with their total disk space, free disk space, and used disk space. This tab gives you a quick indication of how much free space you have left on your hard drive.
Secret: You'll notice that there's a phantom entry in the File Systems devices, called gvfs-fuse-daemon. This is the GNOME Virtual File System (GVFS). The GVFS acts as a proxy to the real filesystem, translating read and write requests from a real mounted device and the GVFS object. The main purpose of GVFS is to allow normal system users to mount filesystems, especially removable filesystems such as USB Memory Sticks and CD-ROMs.
The GVFS simulates the root filesystem in the user's home folder so that any attempts to mount a media device can be made in the user's home folder area with the user's privileges instead of requiring root privileges. This crucial feature of the GNOME desktop allows normal system users to use removable media.
Read the rest of this chapter excerpt.
Printed with permission from Wiley Publishing Inc. Copyright 2009. "Ubuntu Linux Secrets" by Richard Blum. For more information about this title and other similar books, please visit http://www.wiley.com.
20 May 2009