IT Channel.com
Using system properties to configure Windows 7 options
By null
Solutions provider takeaway: You can change some important settings in your customer's Windows 7 operating system through the system properties dialogue box. Changing these settings, such as your customer's computer name or dual-boot settings, to fit your customers needs will simplify day-to-day tasks.
System Properties
The System Properties dialog box has been a cornerstone of configuring advanced Windows options. In Vista, the location for this was moved to Advanced System Settings. Windows 7 retains this location for System Properties. This link can be found on the System page in the Control Panel.
The System Properties dialog box might not look like much, but it controls some very powerful configuration options. Don't worry, all the functions that existed in previous versions of Windows are still available; they are just accessed from different areas now (mostly from the Control Panel). This section examines the five tabs that are still present along with some new features:
- Computer Name
- Hardware
- Advanced
- System Protection
- Remote
About the book
This chapter excerpt on Managing and Monitoring Windows 7 (download PDF) is taken from the book Using Microsoft Windows 7. The Windows 7 advice and troubleshooting tips in this book will help you navigate through the operating system with ease. Help your customers take advantage of Windows 7's features, tools and applications by reading through the online version of the book that includes video, screencast tutorials and podcasts.
Computer Name
This tab is essential for joining a domain or workgroup. A step-by-step walk through of how to accomplish this was discussed in Chapter 9. The Change button here allows you to change your computer name. If you are working on a standalone machine, this may not be critical. But if you join a network or workgroup with several other computers, all of a sudden the computer name Computer-jd2d332 (or any other meaningless default name) will not distinguish your machine as yours. In that case, you need to change the computer name.
Using System Properties to Change Your Computer Name
The following steps show you how to change your computer name using the System Properties dialog box (see Figure 11.10). During this exercise, a reboot of your system is required before you can see the final result.
- Click the Start orb.
- Click Control Panel.
- Click System and Security.
- Click System.
- In the left pane, click Advanced System Settings.
- If a UAC window opens, click Yes.
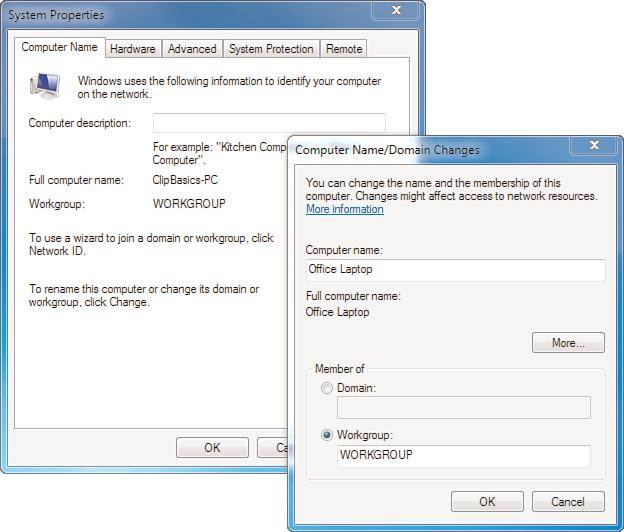
- The System Properties dialog box opens. Click the Computer Name tab.
- Click the Change button. In the Computer Name box, type a new name and click OK.
- A message appears, stating you need to restart your computer for changes to take effect. Click Close.
- A dialog box displays, asking if you want to restart now or later. Select either option.
-
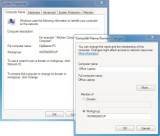
Figure 11.10 Changing the computer name to identify a specific machine.
After you restart your computer, verify your name change by following these steps:
- Click the Start orb.
- Click Control Panel.
- Click System and Security.
- Click System.
- In the main pane, you will see your updated name in the Computer Name, Domain, andWorkgroup Settings group.
Hardware
The Hardware tab provides access to the Device Manager button and the Device Installation Settings button. Device Manager should be a crucial part of your hardware troubleshooting routine. If a device is having problems, look here first.
Device Installation Settings includes an option to Replace Generic Device Icons With Enhanced Icons (see Figure 11.11). The new Device Stage feature of Windows 7 (discussed in chapter 10) uses these high-resolution icons to enhance your device experience. Seeing the icons of two mobile phones or two external hard drives connected to your computer helps you quickly distinguish one from the other.

Figure 11.11 Windows can automatically locate high-resolution icons for your devices.
Advanced
The Advanced tab requires administrator privileges to make most of the changes on this tab. Three buttons are here-Performance, User Profiles, Startup and Recovery and Environment Variables. For the most part, these settings should be left to Windows for automatic configuration. Still, there are times when you will need to make a change. For example, if you are dual-booting Windows 7 and another OS, you might want to make changes to the dual-boot menu (see Figure 11.12).
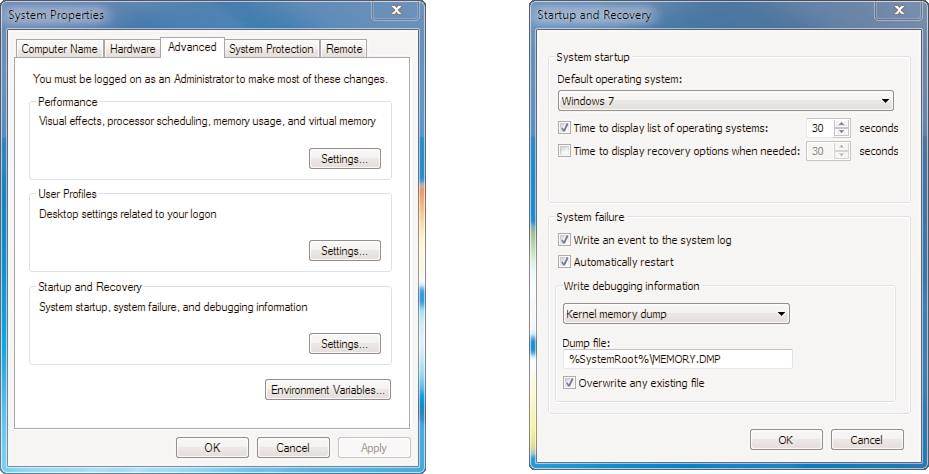
Figure 11.12 Setting up the dual-boot startup menu from Windows 7.
Using System Properties to Configure Dual-Boot Settings
The following steps show you how to configure dual-boot settings from the System Properties dialog box.
- Click the Start orb.
- Click Control Panel.
- Click System and Security.
- Click System.
- In the left pane, click Advanced System Settings.
- If a UAC window opens, click Yes.
- The System Properties dialog box opens.
- Click the Advanced tab.
- In the Startup and Recovery group, click the Settings button. The Startup and Recovery dialog box appears.
- In the Default Operating System group, click the drop-down arrow to select the OS you want to boot first.
- In the Time to Display List of Operating Systems section, select 15 seconds.
About the author
J. Peter Bruzzese is a network specialist with eight years of experience in the information technology sector. Bruzzese helped form Clip Training LLC, which offers a variety of mini clips on topics from Windows operating systems to server applications.
If the system stops booting unexpectedly for no apparent reason, you might want to view a memory dump to isolate the issue. The Startup and Recovery dialog box includes aWrite Debugging Information group; click the drop-down arrow to configure the size of the memory dump—ranging from None through Complete Memory Dump.
System Protection
This tab manages the advanced features for System Protection. This forms the backbone for System Restore. System Protection serves you in two ways:
- If your machine is experiencing trouble (such as a malfunctioning driver or an application install gone awry) and you are unable to resolve it, you can restore your computer to a previous good working state. System Protection automatically creates restore points every seven days or just before a significant system event, such as a software installation.
- System Protection records changes in previous files or folders, allowing you to restore them from earlier saved copies. By clicking the Configure button on the System Protection tab, you can configure the settings and disk space (see Figure 11.13).

Figure 11.13 Advanced System Protection settings.
Remote
The Remote tab enables you to allow connections for both the Remote Assistance application and the Remote Desktop Connection application. For example, you might want to allow a user to connect to your system who has a previous version of Remote Desktop (see Figure 11.14). To do this, select the Allow Connections From Computers Running Any Version of Remote Desktop radio button.
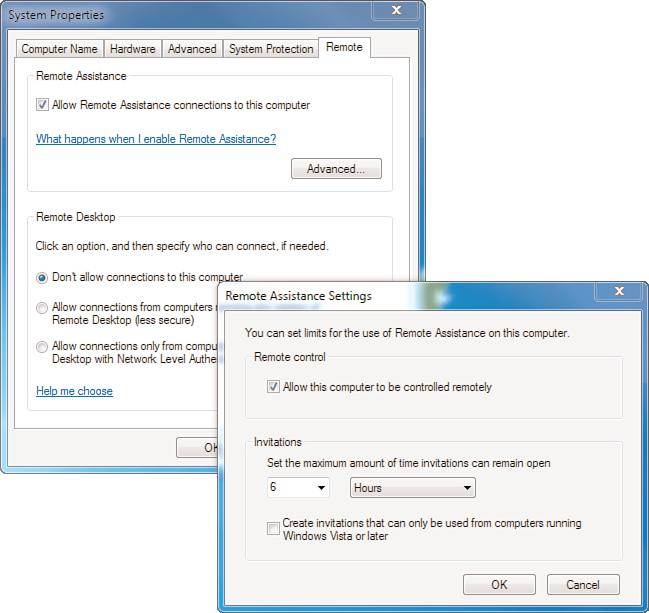
Figure 11.14 Allow users with previous versions of Remote Desktop to assist you.
System Information
System Information contains extensive details about your computer system (see Figure 11.15). There are four components in the left pane which, when expanded, reveal myriad specifics:
- System Summary: Provides general computer information, including Bios settings and System Manufacturer.
- Hardware Resources: Provides hardware information, includingConflicts/Sharing, DMA, Forced Hardware, I/O, IRQs and Memory.
- Components: Provides component information, including Multimedia, CDROM, Sound Device, Display, Infrared, Input, Modem, Network, Ports, Storage, Printing, Problem Devices, and USB.
- Software Environment: Provides software information, including System Drivers, Print Jobs, Running Tasks, Program Groups and more.
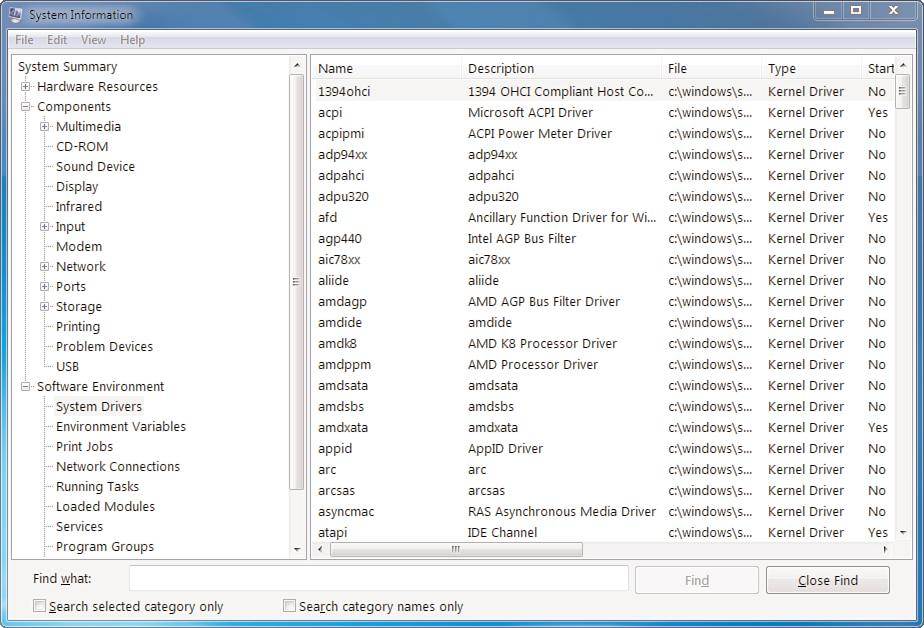
Figure 11.15 Get the facts with System Information.
Accessing System Information
The following steps show you how to access System Information.
- Click the Start orb.
- In the search field, type system.
- Click System Information. The System Information application opens.
At the bottom of the application is a Find What search feature where you can type your search parameter and click Find to search for it in System Information. To look in a specific subcategory, use the checkbox in the lower left.
![]()
![]() Managing and Monitoring Windows
7
Managing and Monitoring Windows
7
![]() Using
the reliability and resource monitor in Windows 7
Using
the reliability and resource monitor in Windows 7
![]() Using
Windows 7 performance monitor to view data
Using
Windows 7 performance monitor to view data
![]() Windows
task manager: Viewing Windows 7 processes and applications
Windows
task manager: Viewing Windows 7 processes and applications
![]() Using
system properties to configure Windows 7 options
Using
system properties to configure Windows 7 options
Printed with permission from Que Publishing. Copyright 2010. Using Microsoft Windows 7 by J. Peter Bruzzese. For more information about this title and other similar books, please visit http://www.quepublishing.com.
11 Aug 2010