New virtual machine management using VMM, PowerShell
Use this chapter excerpt to get tips for new virtual machine management, including how to add a managed host to Virtual Machine Manager by using PowerShell scripts.
|
||||
Automating the Addition of Managed Hosts
Adding a virtual machine host to VMM requires administrative credentials for the physical computer. The requirement of credentials makes it hard to automate any tasks that need to run unattended without sacrificing the security of your credentials. Since the credentials are required parameters to the VMM cmdlets in the script and storing them in clear text might compromise security, you can save your credentials to a file for later use. See the following PowerShell cmdlets for an example:
# First, call Get-Credential to store your credentials to a PowerShell variable
$PSCredential = Get-Credential
# Now construct the file path of the file that will store the credentials
$SecureFilePath = $PSCredential.UserName + ".cred"
$SecureFilePath = $SecureFilePath.Replace("", "_")
# Store the credentials to this file
$PSCredential.Password | ConvertFrom-SecureString | Set-Content $SecureFilePath
When it is time to execute the automated task, you can retrieve this file from the same location and add a host to VMM. In the following code snippet, we are looking to add all Hyper-V hosts in the environment:
# Get the password from the file that we used earlier to store it in
$Password = Get-Content $SecureFilePath | ConvertTo-SecureString
# Create a new PsCredential object for our administrator
# using the stored password
$PSCredential_Out = New-Object
System.Management.Automation.PsCredential("vmmdomainadministrator",
$Password)
# Now discover all the Hyper-V hosts in the domain whose name starts with HyperV
$Computers = Discover-Computer -ComputerNameFilter "HyperV" -Domain
"vmmdomain.com" -FindHyperVHosts -ExcludeVMMHost | select Name
# The output of the discover-computer cmdlet can now be used to
# add these hosts to VMM
foreach ($computer in $Computers)
{
# Instead of prompting for credentials, $PSCredential_Out contains the values
# required by VMM to add a new host
Add-VMHost -Credential $PSCredential_Out -ComputerName $computer
}
Working with MAC Addresses
Virtual Machine Manager manages a static range of MAC addresses that can be used when attaching a virtual network device to a Virtual Machine. MAC addresses that are consumed from this static range can never be reused, in the same way the MAC addresses on physical machines are all unique. To configure the MAC address range, click on the administration view of the VMM Administrator Console and select the Networking option. Figure 8.14 shows a sample MAC address range for a VMM deployment.
Figure 8.14
Global Static MAC Address Range dialog box
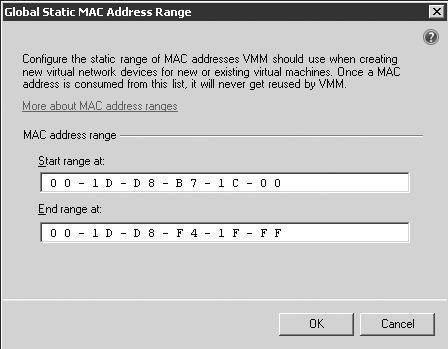
Listing 8.7 shows how to get the next available MAC address from this range and how to commit the selection. Once the MAC address is committed, it will never be used again by VMM.
Listing 8.7: PowerShell script to retrieve the next available MAC address
#First, invoke the New-PhysicalAddress cmdlet to view the next
#available MAC address in the range
#Output will be something like this: 00:1D:D8:B7:1C:00
New-PhysicalAddress
# if you execute the New-PhysicalAddress multiple times, the
#output will not change from 00:1D:D8:B7:1C:00
New-PhysicalAddress
#Now, let's save this MAC address and commit the change in VMM
$MacAddress = New-PhysicalAddress -Commit
# Print the MAC address we just committed (should be 00:1D:D8:B7:1C:00)
$MacAddress
# Show that the next invocation of New-PhysicalAddress will
# return a new MAC Address from the range. (00:1D:D8:B7:1C:01)
New-PhysicalAddress
# Once you have a MAC address, you can invoke the Set-VirtualNetworkAdapter
# cmdlet to set the MAC Address
# First, let's get the virtual network adapter for our Virtual Machine1
$vnic = get-virtualnetworkadapter -vm "
# Now set the properties of the adapter to include this static MAC Address
$vnic | Set-virtualnetworkadapter -Physicaladdresstype Static
-PhysicalAddress $MacAddress
Evacuating a Host for Maintenance
It is sometimes necessary to service the physical computer running the virtualization software, resulting in several hours of downtime. We will show you a script that you can use to evacuate a host from all of its virtual machines instead of the virtual machines being inactive as well. Make sure you monitor the progress of the VMM jobs to ensure that all virtual machines have successfully migrated to a different host. Listing 8.8 contains the code for asynchronously moving all the VMs from a host.
VMM 2008 R2 also introduced a new feature called maintenance mode. A host managed by VMM can be placed into maintenance mode if you want to perform maintenance tasks on the physical host (e.g., replace hardware or install security updates that might require a server reboot). Once a host is in maintenance mode, VMM will no longer allow that host to be the tar-get host for a new virtual machine. In addition, a host that is in maintenance mode is excluded from host ratings calculations during virtual machine placement.
When maintenance mode is initiated on a host, all running virtual machines are put into a saved state. If the host is part of a cluster, then the user is presented with the option to either live migrate all its virtual machines to another host or to save the state of all virtual machines on that host. Live migration is an option only if the host cluster is capable of live migration. This behavior is a little bit different for VMware hosts. Once a VMware ESX host is put into maintenance mode in VMM, VMM will send an ''Enter maintenance mode'' request to VMware Virtual Center. The behavior of the VMs on that host is determined based on the configuration of the maintenance mode feature in Virtual Center.
When maintenance mode is stopped on a host, VMM will allow that host to be the target host of migrations and that host will start receiving a star rating in placement calculations. However, no VMs are restarted on that host, and the VMs that were migrated away from that host are not placed back automatically.
When you're using the maintenance mode feature of VMM 2008 R2, the Disable-VMHost cmdlet places a virtual machine host into maintenance mode while Enable-VMHost removes a host from maintenance mode.
Listing 8.8: PowerShell script to asynchronously move all the VMs from a given host
# get the command line arguments passed to this script
$argslength = $args.length
$expectedArgsLength = 2
# The script takes as input the VMM server name and
# the FQDN of the host to evacuate
$usage = "Usage: ScriptName.ps1
if ($argslength -ne $expectedArgsLength)
{
write-warning $usage; break
}
# helper function to move a VM to the host with the highest star rating
# This function could be easily modified to only move VMs within a
SAN or a cluster
function MoveVM($vmobj, $hostobj)
{
$hostrating = get-vmhostrating -vmhost $hostobj -vm $vmobj
$orderedrating = $hostrating | sort-object rating -descending
Write-Output $orderedrating
$targethost = $null
if ($orderedrating -is [Array])
{
if ($orderedrating[0].Rating -ne 0)
{
$targethost = $orderedrating[0].VMhost
}
}
else
{
if ($orderedrating.Rating -ne 0)
{
$targethost = $orderedrating.VMHost
}
}
if ($targethost -ne $null)
{
write-warning "Moving VM $vmobj to host $targethost"
$resultvm = move-vm -VM $vmobj -vmhost $targethost
-Path $targethost.VMPaths[0] -RunAsynchronously
}
else
{
Write-Warning "There is no suitable host for this VM $vmobj
and it will not be migrated!"
}
}
# get a connection to the VMM server
$vmmserver = $args[0]
$c = get-vmmserver -ComputerName $vmmserver
#Now call Get-VM to cache all the VMs in Powershell
$vms = Get-VM
#Get the host computer and all hosts
$hostname = $args[1]
$VMHost = Get-VMHost -ComputerName $hostname
$AllHosts = Get-VMHost
#Now set this host to maintenance mode to prevent VMs from
#being deployed here
$VMHost | Set-VMHost -MaintenanceHost $true
# Enumerate all VMs on this host and move them asynchronously
foreach ($VM in $VMHost.VMs)
{
MoveVM $VM $AllHosts
}
Utilizing Rapid Provisioning
VMM 2008 R2 introduced a new feature called Rapid Provisioning. This feature was implemented in response to customer demand to improve the time required to create virtual machines. In VMM 2008, the only way to create and deploy a new virtual machine was by utilizing a template, another virtual machine, or a VHD from the VMM library. During the new virtual machine creation process, VMM copied all the required VHDs over the network using the BITS protocol. Depending on the size of VHD and the available bandwidth, this operation could take several minutes to complete.
Several customers have sophisticated SAN technologies that enable them to clone a LUN that contains the VHD and present it to the host. However, customers still want to leverage the VMM template capabilities with operating system (OS) customization. Rapid Provisioning allows you to take advantage of your fast SAN infrastructure to move (or copy) the actual VHD files to the host but tie that back to VMM's rich template customization process. With Rapid Provisioning, you can now create a template that includes the OS configuration and references a ''dummy'' blank VHD. The blank VHD will not be used and will be replaced through the Move-VirtualHardDisk cmdlet. This cmdlet will let VMM know that it should not be using the VHD that is referenced in the template. Instead, VMM should use a VHD that resides locally on the host computer. To indicate to VMM that Rapid Provisioning needs to be used, the New-VM cmdlet takes a new switch called UseLocalVirtualHardDisk. Rapid Provisioning is only available through Windows PowerShell cmdlets.
Listing 8.9 shows an example creation of a virtual machine by utilizing Rapid Provisioning. In this example, C:Win2k8_Base_OS_Sysprep.vhd has to locally exist on the host computer before the New-VM cmdlet is invoked.
Listing 8.9: Creating a new virtual machine using Rapid Provisioning
# Start by specifying the file location for the VHD that will
# be used by the Virtual Machine
$VHDName = "c:Win2k8_Base_OS_Sysprep.vhd"
# Specify other variables for new-vm cmdlet
$vmname = "vm1"
$hostname = "host.contoso.com"
# Get an instance of the host that will be the target
# for the Virtual Machine
$vmhost = get-vmhost $hostname
# Create the jobgroup ID for new-vm from template
$JobGuid = [System.Guid]::NewGuid().ToString()
# Specify the local location for the VHD
# That will replace the "dummy" VHD that exists in the template
# VMM expects that $VHDName already exists on the host computer
# when the new-vm cmdlet is called.
Move-VirtualHardDisk -Bus 0 -LUN 0 -IDE -Path $VHDName -JobGroup $JobGuid
# Get the instance of the template that will be used for OS Configuration $template = Get-Template | where {$_.Name -eq "VMMTemplate"}
# Get the current username to be passed as the Virtual Machine owner
$callerUsername = whoami
# Create the new-vm from template and specify the Rapid
# Provisioning flag (-uselocalvirtualharddisks)
New-VM -Template $template -Name $vmname -Description
"a Virtual Machine created with RP" -Owner $callerUsername
-VMHost $vmhost -UseLocalVirtualHardDisks -Path $vmhost.VMPaths[0]
-RunAsynchronously -JobGroup $JobGuid | Out-Null
Even though Virtual Machine Manager does not provide UI support for creating a virtual machine using differencing VHD disks, this can be accomplished using Rapid Provisioning. Using the public Hyper-V WMI interface, you can create a differencing disk for the c:Win2k8_Base_OS_Sysprep.vhd VHD file used in Listing 8.9. Then, when the Move-VirtualHardDisk cmdlet is executed, you can pass the full path to the child VHD. The differencing disk will then be used as the target VHD for the new virtual machine creation.
Such a process would make it easy for customers to copy a single base disk with the operating system on a host and then use the Rapid Provisioning feature to create multiple virtual machines using differencing disks off that same parent VHD. The following code snippet shows you a partial script that creates a differencing disk from the base VHD. Then it supplies the new VHD file path to VMM for Rapid Provisioning. The following code can be used within Listing 8.9 to create a new virtual machine using differencing disks and Rapid Provisioning:
# Get the Image Management Service WMI instance for the host computer
$VHDService = get-wmiobject -class "Msvm_ImageManagementService"
-namespace "rootvirtualization" -computername $hostname
# Create a differencing disk from the base disk
$DiffVHDName = "c:Win2k8_Base_OS_Sysprep_child.vhd"
$Result = $VHDService.CreateDifferencingVirtualHardDisk($DiffVHDName, $VHDName)
# Wait until the Hyper-V differencing disk creation is complete
# and then pass DiffVHDName to the Move-VirtualHardDisk cmdlet
# This will notify VMM to use the differencing disk for New-VM
# instead of the base disk $VHDName
Move-VirtualHardDisk -Bus 0 -LUN 0 -IDE -Path $DiffVHDName
-JobGroup $JobGuid
In addition to the new UseLocalVirtualHardDisks, VMM 2008 R2 has added one more new switch for New-VM called SkipInstallVirtualizationGuestServices. This switch notifies VMM to skip the installation of the Integration Components (ICs) (also known as Virtual Guest Services) as part of the New-VM cmdlets, decreasing the amount of time required for New-VM to complete. This switch should be used only if you are already certain that your template either contains the ICs or contains an operating system that has built-in integration components. It is important that you ensure that all your VMs have the integration components correctly installed to take full advantage of virtualization and virtualization management. The SkipInstallVirtualizationGuestServices will take effect only in the following three New-VM scenarios:
- New virtual machine from VHD
- New virtual machine utilizing an existing virtual machine
- New virtual machine from a template that does not have an OS configuration specified
The following code shows an example invocation of the New-VM cmdlet that utilizes this new switch. This new switch can also be used along with the UseLocalVirtualHardDisks switch to further speed up the New-VM process. Here's the code:
# Specify variables needed for the new-vm cmdlet
$vmname = "vm2"
$hostname = "host.contoso.com"
# Get an instance of the host that will be the target
# for the Virtual Machine
$vmhost = get-vmhost $hostname
# Create the jobgroup ID for new-vm from template
$JobGuid = [System.Guid]::NewGuid().ToString()
# Get the instance of the template that will be used for OS Configuration
$template = Get-Template | where {$_.Name -eq "VMMTemplate"}
# Get the current username to be passed as the Virtual Machine owner
$callerUsername = whoami
# Create the new-vm from template and specify the
# SkipInstallVirtualizationGuestServices switch to skip
# the Install VM components step of the New-VM cmdlet
New-VM -Template $template -Name $vmname -Description
"a Virtual Machine created with RP" -Owner $callerUsername
-VMHost $vmhost -SkipInstallVirtualizationGuestServices
-Path $vmhost.VMPaths[0] --RunAsynchronously
-JobGroup $JobGuid | Out-Null
Specifying CPU Settings
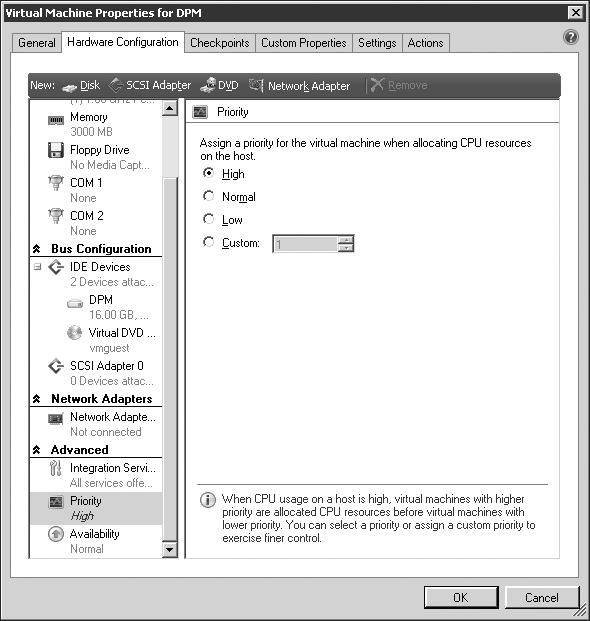
The Virtual Machine Manager Administrator Console only exposes the Virtual Machine Priority setting as part of the virtual machine properties. The priority of a VM, which decides how to allocate CPU resources on the host for this VM, can be specified in the Hardware Configuration tab, as shown in Figure 8.15. VMM exposes two more CPU properties for a virtual machine through Windows PowerShell only and the Set-VM cmdlet:
CPUMax Specifies the highest percentage of the total resources of a single CPU on the host that can be used by a specific virtual machine at any given time.
|
||||
CPUReserve Specifies the minimum percentage of the resources of a single CPU on the host to allocate to a virtual machine. The percentage of CPU capacity that is available to the virtual machine is never less than this percentage.
A third PowerShell property, called RelativeWeight, is the same as the VM Priority property seen in Figure 8.15. Use this command to create a new hardware profile with the three CPU properties set at different levels.
Figure 8.15
CPU priority for a virtual machine
The following code shows an example creation of a virtual machine with the CPU properties:
# Get the instance of a host
$vmhost = get-vmhost "host.contoso.com"
# Get the instance of a VHD that will be used during New-VM
$vhd = (Get-VirtualHardDisk)[0]
# Create a new hardware profile with the CPU settings set
$hwProfile = New-HardwareProfile -Name "cpuHWProfile" -description ""
-CPUMax 70 -CPUReserve 50 -RelativeWeight 80
# Create the new Virtual Machine with the hardware profile specified
New-VM -Name "cpuVM" -VirtualHardDisk $vhd -VMHost $vmhost -HardwareProfile
$hwProfile -Path $vmhost.VMPaths[0]
# Show that the new Virtual Machine created has the specified CPU settings
Get-VM -Name "cpuVM" | Select Name, Hostname, CPUMax, CPUReserve,
RelativeWeight
Clustering Cmdlet Switches
VMM 2008 R2 provides support for the new Windows Server 2008 R2 Hyper-V features, including Live Migration in a failover cluster environment. From the VMM Administrator Console, if Live Migration is available for a virtual machine, then that is the only option offered to an administrator for migrating the virtual machine to another node in the cluster. If you want to force the transfer type of the virtual machine to be Quick Migration (Quick Migration saves the state of a virtual machine prior to changing its ownership to another node in the cluster) even if Hyper-V Live Migration is available, use the UseCluster switch with this command:
Move-VM -VM $myVM -vmhost $VMHost -Path $VMHost.VMPaths[0] -UseCluster
Hyper-V Live Migration allows only one cluster node to participate in a live migration at any point in time. VMM implemented a queue to track active live migrations and ensure that all user-executed live migrations complete in order. If you would like the Move-VM cmdlet to fail if a Hyper-V live migration is in progress and your live migration cannot start immediately, use the BlockLMIfHostBusy switch with this command (this switch will not utilize the VMM Live Migration queue):
Move-VM -VM $myVM -vmhost $VMHost -Path $VMHost.VMPaths[0] -BlockLMIfHostBusy
Monitoring and Reporting
Creating automated tasks that checks the health of your system and emails the administrator on critical errors can be accomplished very easily with a few cmdlets. In this section, we will show you a few cmdlets that can prove useful in assessing the overall health of your system. If you would like to bundle these scripts into an automated task and enable email notification, you can look into the SMTP emailing properties of the class System.Net.Mail.MailMessage.
Use this command to get the overall status of the virtual machines' health:
Get-VM | Select Name, ID, Status | sort-object Status
Use this command to get a list of all virtual machines and their host names:
# VMID is the unique identifier of the VM on the virtualization platform
(i.e. Hyper-V)
# ID is the unique identifier of the VM in Virtual Machine Manager
Get-VM | Select Name, ID, HostName, VMID
Use this command to get a list of the last job run on each virtual machine:
Get-VM | Select Name, ID, MostRecentTask
Use this command to get the health information of the hosts:
Get-VMHost | select Name, OverallState, CommunicationState,
VirtualServerState, VirtualServerVersionState
Use this command to get the health information of the managed physical computers:
Get-VMMManagedComputer | select Name, State, VersionState, UpdatedDate
Use this command to create a report of two custom properties of a virtual machine:
# You can use the Customer Properties of a VM to add any data you would like to
# associate with a VM. In this example, we chose CostCenter and
# LastUpdated for the first two custom properties
Get-VM |select Name, Status,
@{Name='CostCenter';Expression={$_.CustomProperties[0]}}, @{Name='LastUpdated';Expression={$_.CustomProperties[1]}}
Use this command to get the list of virtualization platforms in VMM:
Get-VMHost | select Name, VirtualizationPlatformDetail | sort-object
VirtualizationPlatformDetail --descending
Use this command to get the last 10 jobs that were run in VMM, their owners, and the affected objects:
$jobs = get-job | sort-object StartTime -Descending | select Name,
ResultName, ResultObjectType, Status, Owner
$jobs[0..10]
When invoking Windows PowerShell cmdlets, it is useful to be able to identify if an error occurred. Use the following command to clear any existing errors in the error pipeline and then use the same object to check for errors:
# Clear any existing errors from the error pipeline
$Error.Clear()
# Invoke a cmdlet. As an example, I used get-vmmserver
$c = get-vmmserver -ComputerName "localhost"
# Check if any errors occurred
if ($Error.Count -ne 0)
{
# An error occurred here. Do something about it and terminate
# the script
}
The Bottom Line
Describe the main benefits that PowerShell offers for VMM. Windows PowerShell is a relatively new technology that was developed by Microsoft Corporation. Virtual Machine Manager utilized this technology as the scripting public API for VMM and as the backbone of the Administrator Console.
Master It What version of Windows PowerShell does VMM support?
Which are the VMM assemblies needed for programmatically integrating with VMM's cmdlets?
List the benefits that Windows PowerShell cmdlets offer as a public API.
Create scheduled PowerShell scripts. Scheduling PowerShell scripts allows an administrator to perform operations during nonwork hours and get reports on the progress and the results of those operations.
Master It How can you create a scheduled task in Windows?
List an example PowerShell script that checks if any host is in an unhealthy state and needs an administrator to take a look at it.
Use the VMM PowerShell cmdlets. Understanding the usage, scope, and association of the different VMM cmdlets and PowerShell objects allows an administrator to effectively manage VMM through Windows PowerShell.
Master It How can you identify the proper parameters and syntax for the Add-VMHost cmdlet?
How can you add the VMM PowerShell snap-in programmatically to a PowerShell script? How does the Windows PowerShell pipeline work?
![]()
![]() Automation Using PowerShell
Automation Using PowerShell
![]() Using Windows Powershell scripts for task automation
Using Windows Powershell scripts for task automation
![]() Virtual machine migration via Windows PowerShell scripts
Virtual machine migration via Windows PowerShell scripts
![]() New virtual machine management using VMM, PowerShell
New virtual machine management using VMM, PowerShell
Printed with permission from Wiley Publishing Inc. Copyright 2009. Mastering Virtual Machine Manager 2008 R2 by Michael Michael and Hector Linares. For more information about this title and other similar books, please visit Wiley Publishing Inc.