IT Channel.com
MMC console management: Adding Windows 7 snap-ins
By null
Solution provider's takeaway: The decisions that you make when adding or removing Windows 7 snap-ins to your customer's MMC console can help determine how easy the console is to manage. Read through the different snap-ins and configuration settings available in a MMC console.
Microsoft Management Console 3.0
Microsoft has based most of its management applications on the Microsoft Management Console, or the MMC. The MMC provides a framework for building management consoles. This framework has been used by Microsoft and many third-party application vendors for creating their management consoles. In fact, many of configuration tools available in Windows 7 are really MMC consoles with pre-added snap-ins. The consoles are then saved in such a way that they cannot be directly altered by users.
The MMC contains snap-ins that are used for system and application management. As seen in Figure 5.22, Windows 7 comes with many built-in MMC snap-ins that can be used to manage the system. These snap-ins can
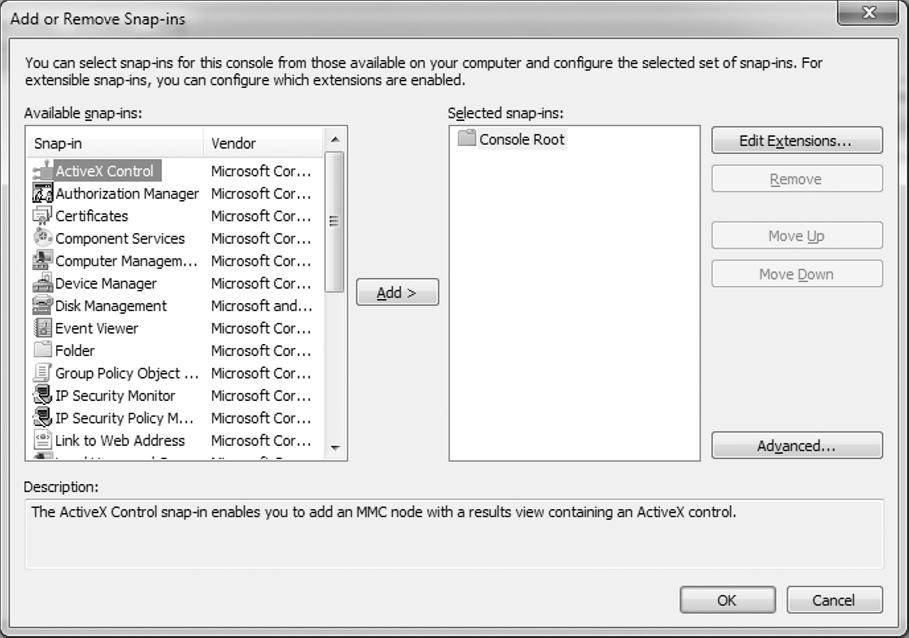
Figure 5.22: Windows 7 MMC Snap-ins
be used to manage user settings, Windows applications, security, and many other vital aspects of the system.
Windows 7 contains the following built-in MMC snap-ins:
- ActiveX Control – This snap-in allows you to add individual ActiveX controls to view and configure. ActiveX controls are Internet Explorer plug-ins that are used to add functionality to the browser.
- Authorization Manager – This snap-in allows you to set permissions for Authorization Manager-enabled applications.
- Certificates – This snap-in allows you to configure the different certificate stores available on the system. Certificates help provide a secure operating environment for your system. You can use them for identification, securing data, and securing communications. There are certificate stores in place for users, applications, and the system itself.
- Component Services – This snap-in is used to manage the system's COM+, or Component Services configuration. You can also configure Distributed Computer Object Model (DCOM) and Distributed Transaction Coordinator (DTC) settings using this snap-in. These are especially important when programs need to communicate between multiple computers.
- Computer Management – This snap-in is actually a collection of snap-ins used for task scheduling, disk management, performance monitoring, and many other configuration and management tasks. These snap-ins are grouped together under Computer Management for ease of use.
- Device Manager – This snap-in is used for viewing and configuration of hardware devices installed on the system. You disable devices, update drivers, and troubleshoot potential issues with your hardware devices.
- Disk Management – This snap-in is used for disk and volume management. You can create volumes, format disks, and enable fault tolerance.
- Event Viewer – This snap-in is used to view the system event logs. These logs can help you determine if your system or applications are having problems. The Security log can also be used to determine if there is unauthorized access to your system.
- Folder – This snap-in is used to add a folder than can be used for organizing your snap-ins. This can come in very handy if you have added many snap-ins to a single MMC console.
- Group Policy Object Editor – This snap-in is used for configuring the Group Policy Objects on the system. Group policies are used to provide a centralized way for managing your systems.
- IP Security Monitor – This snap-in is used to monitor the status of your IP Security (IPsec) configuration. IPsec is used to secure communications between computers. This snap-in can help you determine which IPsec policies are being applied to your systems.
- IP Security Policy Management – This snap-in is used to understand and configure the settings in your IPsec policy.
- Link to Web Address – This snap-in allows you to add a Web page to the MMC. This can be useful for applications and systems with Webbased management.
- Local Users and Groups – This snap-in allows you to configure users and groups on the local system. You can add user accounts, delete user accounts, and configure various user properties.
- NAP Client Configuration – This snap-in allows you to configure Network Access Protection (NAP) client configuration settings. NAP is a security feature that is used to limit who can gain access to your network.
- Performance Monitor – This snap-in allows you to monitor your system performance, including memory, hard disks, processors, and many other components.
- Print Management – This snap-in is used to manage print servers and printers connected to the system.
- Resultant Set of Policy – This snap-in is used to show what settings will be applied to the system after all policies have been applied. This helps when you want to test out your Group Policy settings without actually applying them to the system.
- Security Configuration and Analysis – This snap-in provides configuration and analysis of security templates being applied to the system.
- Security Templates – This snap-in allows you to edit the security templates that can be applied to the system.
- Services – This snap-in allows to you view and configure the properties for services running on the system. You can disable, start, stop, or restart services. You can also configure authentication and fault tolerance for services.
- Shared Folders – This snap-in allow you to view properties and status information for file shares that exist on the system. You can see what folders are beings shared and who is accessing them.
- Task Scheduler – This snap-in allows you to sche
- dule tasks to be automatically run at specified times and/or at specified intervals.
- TPM Management – This snap-in allows you to configure the Trusted Platform Module, if one exists in the system. Trusted Platform Modules are used to generate keys for cryptographic operations.
- Windows Firewall with Advanced Security – This snap-in allows you to configure Windows Firewall settings on the system. You can control what processes, applications, and systems can access your system or generate network traffic from your system.
- WMI Control – This snap-in allows you to configure and manage the Windows Management Instrumentation (WMI) service. WMI is used for management and monitoring of Windows systems.
To add snap-ins to an MMC console, do the following:
- Run the command MMC.exe from a command prompt or from the Windows 7 Search bar.
- If prompted by UAC to allow the MMC to make changes to the computer, click Yes. This should bring up a blank MMC console.
- From the File menu, select Add/Remove Snap-in.
- From the Add or Remove Snap-ins window, choose the snap-in you want to add. Click Add. Depending on the snap-in you add, you may be prompted for additional information.
- After you have added all your snap-ins, click OK. You snap-ins should now appear in the MMC.
The MMC can be very flexible. You can add whatever snap-ins you want to a blank MMC console. You can also modify one of the predefined management tools that use the MMC. After you have modified an MMC console, you have the option to save your changes. Simply select File | Save or File | Save As, whichever is appropriate.
There are also other options available for controlling what can and cannot be done inside an MMC console. If you choose File | Options, you will be presented with the MMC Options window, as seen in Figure 5.23. Here, you can change the icon used for console, or set the console mode. The console mode determines what users can and cannot see within the console and what changes they can make. The following are the four basic console modes available for the MMC:
- Author mode – This mode gives you full access to do anything in the MMC. You can add and remove snap-ins, create views, and open new windows.
- User mode – full access – This mode give you full access to the tree within the MMC. But, you cannot add or remove snap-ins.
- User mode – limited access, multiple window – This mode prevents you from being able to view contents of the tree that are not visible in the console window.
- User mode – limited access, single window – This mode opens the console with just a single window. Users cannot view items that do not appear in that window.
The Options window allows you to specify if changes to the console can be saved. There is also an option for whether or not to allow the user to customize the console views.
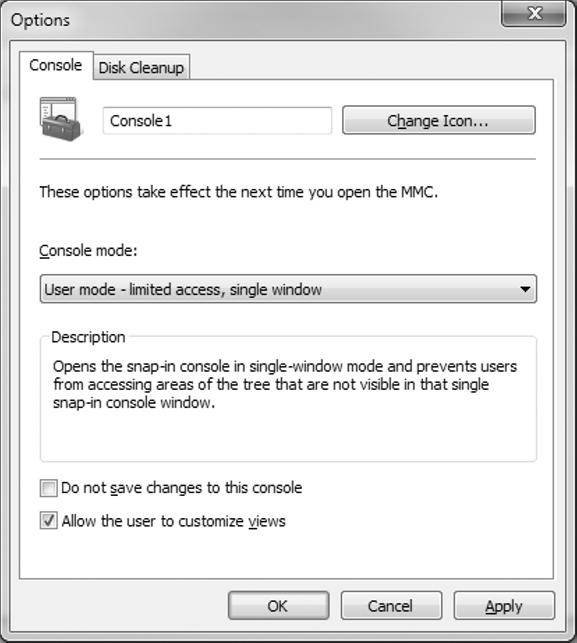
Figure 5.23: MMC Options Window
Computer Management Console
The Computer Management console is a predefined MMC-based management tool. It contains several snap-ins that aid in managing your system. These snap-ins are available individually, but are put together in one console to make management easier. The Computer Management console can be accessed by right-clicking on Computer on the Start menu and selecting Manage. Or you can add the Computer Management snap-in to your own customized MMC console.
As seen in Figure 5.24, the Computer Management console contains three categories that contain the actual snap-ins: System Tools, Storage, and Services and Applications.
- System Tools – Task Scheduler, Event Viewer, Shared Folders, Local Users and Groups, Performance, Device Manager
- Storage – Disk Management
- Services and Applications – Services, WMI Control
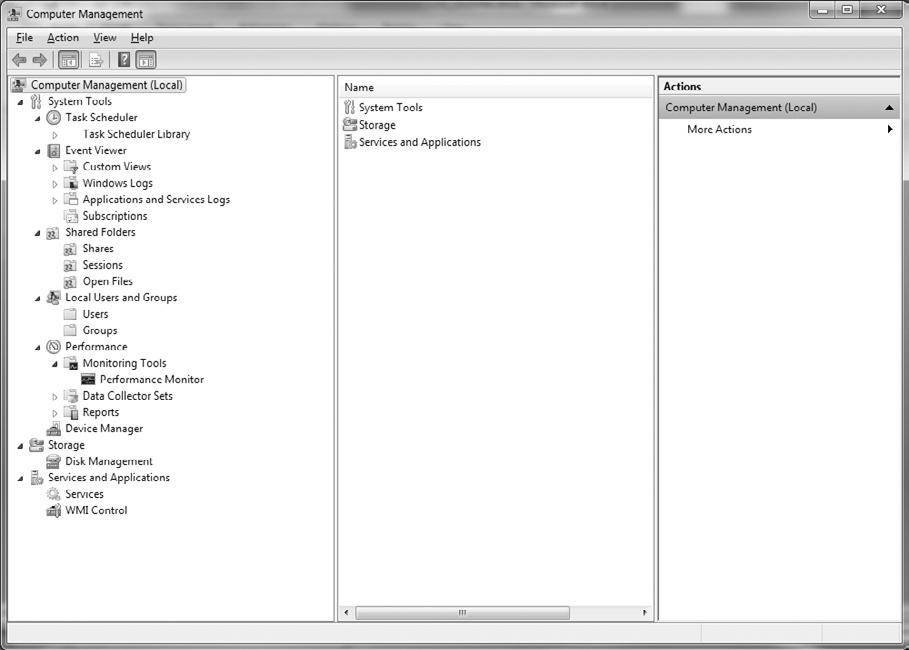
Figure 5.24: Computer Management Console
These snap-ins are used to manage the system. Again, these snap-ins can be used individually. The Computer Management console just puts them all together to make management easier. If you need to, you can create a custom MMC console with these snap-ins in addition to others.
Local Group Policy Editor
Setting individual settings can be quite cumbersome. To help Windows uses the concept of group policies. Group policies can be used to easily set multiple settings. Windows 7 comes with an MMC snap-in called Group Policy Object Editor. You can add this snap-in to the MMC and choose Local Computer when asked which Group Policy Object to edit. Now, you can edit the computer's local group policy.
As seen in Figure 5.25, the local computer policy is divided into two main sections: Computer Configuration and User Configuration.
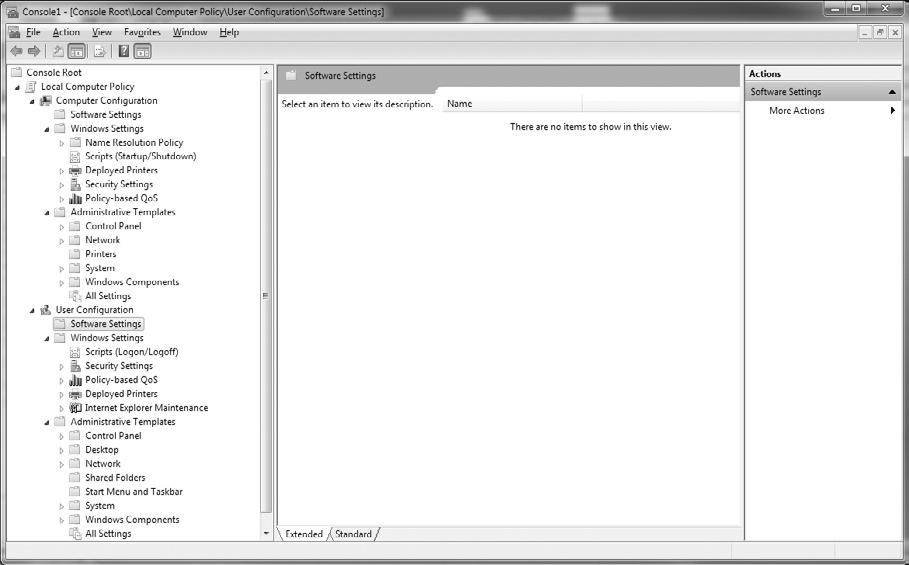
Figure 5.25: Local Computer Policy Snap-in
Computer Configuration
The Computer Configuration section is used for computer-wide settings. Many of these settings are applied when the system first boots up. These settings will apply to any user who logs into the system. The Computer Configuration section contains three subfolders:
- Software Settings – By default, there is nothing to be configured here.
- Windows Settings – These are general Windows settings that can be configured for all users. There are subnodes for Name Resolution Policy, Scripts(Startup/Shutdown), Deployed Printers, Security Settings, and Policy-based QoS.
- Administrative Templates – These are registry-based settings that can be set for the system. There are subnodes for Control Panel, Network, Printers, System, and Windows Components.
User Configuration
The User Configuration section is used for user-specific settings. Most of these settings are not applied until a user logs into a system. These settings will apply no matter what system a user logs into. The User Configuration section contains three subfolders:
- Software Settings – By default, there is nothing to be configured here.
- Windows Settings – These are general Windows settings that can be configured for all users. There are subnodes for Scripts(Logon/Logoff), Security Settings, Policy-based QoS, Deployed Printers, and Internet Explorer Maintenance.
- Administrative Templates – These are registry-based settings that can be set for the system. There are subnodes for Control Panel, Desktop, Network, Shared Folders, Start Menu, and Taskbar, System, and Windows Components.
Windows Registry
The registry has long been the central configuration store for Windows systems. The registry is divided in categories called hives. These hives are where the actual configuration settings are stored.
There are five main hives in the registry are as follows:
- HKEY_CLASSES_ROOT – This maintains file type associations.
- HKEY_CURRENT_USER – This maintains user settings for the user currently logged into the system.
- HKEY_LOCAL_MACHINE – This maintain system-wide settings.
- HKEY_USERS – This maintains user settings for all users.
- HKEY_CURRENT_CONFIG – This maintains information about the current hardware configuration.
The registry can be modified directly or indirectly. You must be careful when modifying the registry directly. Any misconfigurations or typos can severely affect the functioning of your system. Regedt32 is the primary tool provided with Windows 7 for modifying the registry. You can use Regedt32 to configure registry settings and to set registry permissions.
Simplified Configuration and Management of Desktops
Microsoft developers included an undocumented method for simplifying administration by combining shortcuts. It is a simple and single container with multiple shortcuts to Windows 7 options that are available through other methods as seen in Figure 5.26. This may be helpful for administrators and power users alike to configure and manage single Windows 7 desktops.
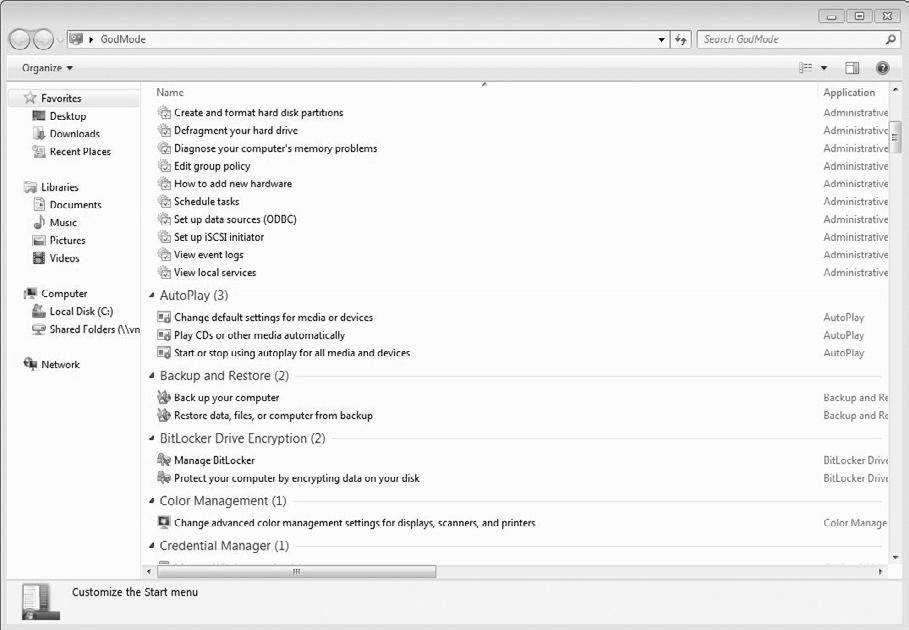
Figure 5.26: Combined Shortcut Window

Figure 5.27: Control Panel Icon
To create a Combined Shortcut window:
- Right-click on the desktop or anywhere in Windows Explorer where you would like this shortcut.
- Select New | Folder
- Name the folder: <Name>.{ED7BA470-8E54-465E-825C- 99712043E01C}
- The folder icon will change to a Control Panel icon, as seen in Figure 5.27.
To use the combined folder, simply double-click the Control Panel icon just created for your new applet. A Windows Explorer window will open with shortcuts for many different configuration options in Windows 7. All of these options are available through other methods, mostly through the standard Control Panel shortcuts.
![]()
![]() Managing the Windows 7 Desktop
Environment
Managing the Windows 7 Desktop
Environment
![]() MMC console management: Adding Windows 7 snap-ins
MMC console management: Adding Windows 7 snap-ins
![]() Hardware
devices for Windows 7: Installation, management
Hardware
devices for Windows 7: Installation, management
![]() Using
the Disk Management MMC to manage Windows 7 disks
Using
the Disk Management MMC to manage Windows 7 disks
Printed with permission from Syngress Publishing. Copyright 2010. Microsoft Windows 7 Administrator's Reference by Jorge Orchilles. For more information about this title and other similar books, please visit http://scitechconnect.elsevier.com/category/computer-security/.
13 Oct 2010