IT Channel.com
WIndows 7 dual monitor not working? Read these tips
By null
Chapter 23 discussed briefly the procedure for setting up multiple monitors. In this section, we explain a few of the more convoluted details and issues that can occur when installing dual monitors.
As you know, Windows 7 supports dual or multiple monitors, a great feature first developed for Windows 98. You can run up to 10 monitors with Windows 7, but normally, you will use no more than two or three. Using multiple monitors lets you view a large amount of information at a glance. Use one screen for video editing, web design, or graphics and another for toolbars. Leave a web or email display up at all times while you use another monitor for current tasks. Stretch huge spreadsheets across both screens.
Here are some rules and tips about using multiple monitors:
- Some laptops support attaching an external monitor and can display different views on the internal LCD screen and on the external monitor. This feature is called Dual View, and if your laptop supports it, your user's manual will show you how to enable it. You can ignore this section's instructions on installing a device adapter and just follow the instructions to set Display properties to use a second monitor.
- Because most computers have no more than one or two PCI slots open, if you want to max out your video system, look into one of the multimonitor video cards available from Matrox, ATI, and various other vendors. From a single slot, you can drive four monitors with these cards. With only two slots, you can drive four to eight monitors. Multimonitor video cards are available for both AGP and PCI slots. Today, most modern graphics cards will drive two monitors without requiring additional hardware of any kind.
- The latest video interface kid on the block, dubbed PCI Express (PCIe) will be at the center of PC graphics for the foreseeable future. The old video champ, AGP, is on its way out. PCIe offers double the bandwidth of AGP 8x. PCI Express X16 slots have peak bandwidth levels of 4.0 GBps (up to 8.0 GBps bidirectional), compared to 2.1 GBps for AGP 8x. PCIe usually supports two displays, but some quad-link versions that support four displays are also available. Look for one (be sure your system can accept it) if high performance (such as video or high-end production work) is your aim
- Many multimonitor arrangements consist of two cards. Today, that usually means dual PCI-e graphics cards.
- If you mix AGP and PCI, older BIOSs sometimes have a strange habit of forcing one or the other to become the "primary" display. This is the display that Windows first boots on and the one you use to log on. You might be annoyed if your better monitor or better card isn't the primary display, because most programs are initially displayed on the primary monitor when you launch them. Therefore, you might want to flash upgrade your BIOS if the maker of your computer or motherboard indicates that an upgrade will improve support for dual monitors on your computer by letting you decide which monitor or card should be the primary display.
- Upon connecting a second monitor, you should be prompted with a dialog box that asks you whether you want to use a mirror arrangement or an extended desktop arrangement. With some luck, this wizard will be all you need to fiddle with. If not and you're unhappy with the default choice of primary display, you can adjust it with Display properties once both displays are running.
- If you update an older system to Windows 7, the OS always needs a VGA device, which becomes the primary display. The BIOS detects the VGA device based on slot order, unless the BIOS offers an option to choose which device to treat as the VGA device. Check your BIOS settings to see whether any special settings might affect multimonitor displays, such as whether the AGP or PCI card defaults to primary, or the PCI slot order. Slot 1 is usually the slot nearest the power supply connector.
- The design of the card itself, not the monitor, enables it to operate with multiple monitors on Windows 7. Don't expect any vendors to add multimonitor support simply by implementing a driver update. Either a card supports multiple monitors or it doesn't.
- Most laptops these days support mirror and extended view modes. How well they do depends on their video card and the amount of video RAM. Note: There is a key combo on most laptops that turns the output to the external monitor off or on. Typically, it is the FN key (lower-left corner of the keyboard) combined with another key such as F4 or F5. Look closely at the little icons on your laptop's key tops. You may have to press a combination a few times to get to the desired setup (such as laptop screen on and external screen on, or just one screen on).
TIP
Microsoft doesn't provide many specifics about which video cards/chipsets work in multimonitor mode, perhaps because BIOS and motherboard issues affect the results different users obtain from the same video cards. The Realtime Soft website contains a searchable database of thousands of working combinations and links to other multimonitor resources, including Realtime Soft's own UltraMon multimonitor utility. Check it out at www.realtimesoft.com/multimon.
- On older motherboards with onboard I/O such as sound, modem, and LAN, you may have difficulties with multimonitor configurations, especially if devices share an IRQ with a particular PCI slot. You might want to disable any onboard devices you're not using, to free up resources for additional video cards to use instead.
- Just because a set of cards supports multimonitoring under a previous version of Windows (even Windows XP) doesn't mean it works under Windows 7. Windows 7 has stricter hardware requirements as part of its strategy to increase reliability (that said, if it works with Vista it probably also works with Windows 7).
These steps detail a likely installation scenario for a secondary display adapter for use with multiple monitors. It's possible that it will be much simpler for your system. I have included details step by step mostly for those who run Windows 7 on older systems and add a second display card. With newer systems, such as laptops with dual-monitor video display chipsets, you simply plug in an external monitor and turn it on, Windows detects it, walks you through a wizard, and you're done.
- Boot up your system into Windows 7, and plug in the second monitor. Or you can right-click a blank area of your desktop. From the resulting pop-up menu, select Properties.
- Go to the Settings tab. Confirm that your primary display adapter is listed correctly. (That is, if you have an ATI Rage Pro, ATI Rage Pro should be listed under Display.) Your display adapter should not be listed as plain-old "VGA," or multimonitoring will not work. If this is the case, you need to find and install correct Windows 7 drivers or consult your graphics card manufacturer's website.
- After you confirm that the right drivers are loaded for your display adapter and that you are in a compatible color depth, shut down and then power off your system.
- Disconnect the power cable leading to the back of your system and remove the case cover. Confirm that you have an available PCI slot. Before inserting your secondary display adapter disable its VGA mode, if necessary, by adjusting a jumper block or DIP switch on the card. Newer cards use the software driver or BIOS settings to enable or disable VGA mode.
Can't Select the Primary Display
It can sometimes be tricky to force Windows 7 to use a particular video display card as the secondary display. It usually defaults to one card and grays out Primary on the other one. If a display card isn't disabled from running in VGA mode, the computer runs the card's power-on self test (POST). When that happens, Windows 7 assigns it primary display status; if the other card's VGA mode can't be disabled, you cannot use the secondary card. Most users will want to keep their first video card as the primary display, so they need to know how to prevent this unwanted POST from occurring.
Generally, dual-display works best and easiest with a multihead graphics card, available in PCIe as well as older AGP and PCI designs. However, many setups use a mix of one AGP and one PCI, or one AGP and one PCIe. This doesn't guarantee that the faster video card will wind up being your primary display. You may need to set the system BIOS option for default video to PCI to enable an AGP+PCI dual display, or to AGP for an AGP+PCIe dual display, to work properly.
If your video card uses a jumper block or switch to disable VGA mode, this option makes it easier to use the card as a secondary card because only the primary card needs VGA mode. VGA mode is used for the system's POST and to display startup options before the Windows GUI gets initialized.
Many desktop systems with onboard video automatically disable the onboard video when you install any video card (PCI, AGP, or PCIe), which makes it necessary to install two video cards(or a multimonitor video card) to obtain multimonitor support.
About the book
This chapter excerpt on Installing and Replacing Hardware (download PDF) is taken from the book Microsoft Windows 7 In Depth. The book has information on various Windows 7 topics, including installing and upgrading Windows 7, multimedia and imaging, networking, maintenance and security.
Generally, you can't tell whether a secondary card will work until after you boot Windows 7 with the secondary card in place. Then, the system detects the card and installs the drivers, and the system tries to initialize the card. If the card gets initialized successfully, you should see the Windows desktop on both screens.
If the secondary monitor's screen stays black, check the Device Manager listing for the video card. If the card is listed with a yellow exclamation mark, it's not working properly. A Code 10 error on the card's properties dialog box General tab indicates the card was unable to start.
Restart the system, change the default display setting in the BIOS, and retry it. If necessary, try the card in a different slot.
Something else to try is to right-click an open space on the desktop and choose Personalize, Display, and then right-click the icon for the monitor that you want to make Primary and choose Primary.
- Insert your secondary display adapter, secure it properly with a screw, reassemble your system, and reconnect the power. Next, connect a second monitor to the secondary display adapter.
- Turn on both the monitors and power up the system. Allow the system to boot into Windows 7.
- After you log in, Windows 7 detects your new display adapter and may bring up the Add New Hardware Wizard. Confirm that it detects the correct display adapter and, when prompted, tell Windows 7 to search for a suitable driver. Then click Next.
- Windows 7 then finds information on the display adapter. When you are prompted, insert your Windows 7 installation CD, or browse to the driver file for your adapter, and click OK.
- Windows 7 then copies files. When the process is completed, click Finish. Windows 7 then also detects your secondary monitor (if it is a PnP monitor). When prompted, click Finish again.
NOTE
All this detection may occur without intervention on your part, and a balloon may appear on the task bar announcing that your new hardware is ready to be used.
- After all appropriate drivers are installed, and your secondary monitor is connected and turned on, a wizard should pop up asking how you want to use the newly connected monitor: either as a mirror (repeating what is on the primary monitor) or for an extended desktop area (meaning you can move your mouse across both monitors). Answer accordingly. If you don't see the wizard, right-click a blank portion of your desktop and select Personalize. Then choose Display. You will notice that two Monitor icons now appear in the center window of the display applet, representing your two monitors (see Figure 27.3).Click the Monitor icon labeled 2, and it becomes highlighted in blue.
- Under the Change the Appearance of Your Displays heading, your secondary display should be visible. In the Multiple Displays pull-down list, select Extend These Displays, and then click Apply. Click Keep Changes to make this change permanent.
NOTE
You can set up Windows 7 with more than one secondary display, up to a maximum of nine additional displays. To do so, just select another supported secondary display adapter with VGA disabled and repeat the preceding steps with another monitor attached to the additional secondary adapter, or attach more than one monitor to either (or both) of your display adapters.
- While the Monitor icon labeled 2 is highlighted, you adjust the resolution and orientation for the new monitor.
- To change the way your monitors are positioned, click and drag the Monitor icons around. (Note that displays must touch along one edge.) When you find a desirable position, release the mouse button, and then click Apply, and the Monitor icon is aligned adjacent to the other Monitor icon. Also note that wherever the two displays meet is the location your mouse cursor can pass from one display to the next. That's why a horizontal alignment is preferred for a standard desktop arrangement (see Figure 27.3).
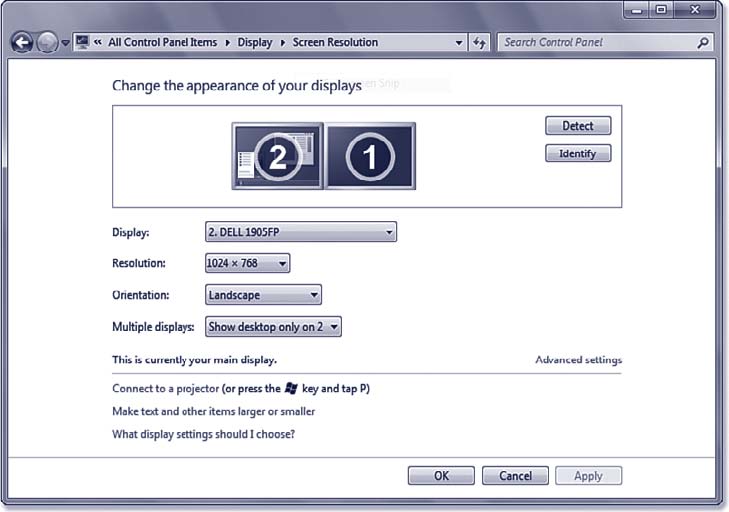
Figure 27.3
A system running dual monitors.
After you finish these steps, you can drag items across your screen onto alternate monitors. Better yet, you can resize a window to stretch it across more than one monitor. Things get a little weird at the gap, though. You have to get used to the idea of the mouse cursor jumping from one screen into the next.
TIP
If you're not sure which monitor is which, click the Identify button, shown in Figure 27.3, to display a large number on all screens.
![]()
![]() Installing and replacing Windows 7 hardware
Installing and replacing Windows 7 hardware
![]() Upgrading Windows 7 hardware for maximum performance
Upgrading Windows 7 hardware for maximum performance
![]() Adding and removing Windows 7 hardware
Adding and removing Windows 7 hardware
![]() Installing and troubleshooting multiple monitors for Windows 7
Installing and troubleshooting multiple monitors for Windows 7
![]() Installing, configuring and testing a UPS for Windows 7
Installing, configuring and testing a UPS for Windows 7
![]() How Windows 7 hardware upgrades affect licensing
How Windows 7 hardware upgrades affect licensing
About the authors
Robert Cowart has written for PC Week, Mac World, A+, PC World and Microsoft Systems Journal. Cowart has authored 32 books and has written more Windows books than any other author. He has taken part in the PBS TV series Computer Chronicles and has several bestseller books, including Windows NT 4 Unleashed.
Brian Knittel is a software developer, consultant and writer that specializes in document conversion and networking. Knittel studied at the University of California at Berkeley and co-wrote Special Edition Using Microsoft Windows 2000 Professional and Special Edition Using Microsoft Windows XP Home Edition.
Printed with permission from Que Publishing. Copyright 2009. Windows 7 In Depth by Robert Cowart and Brian Knittel. For more information about this title and other similar books, please visit Que Publishing.
07 Oct 2009