Adding and removing Windows 7 hardware
Use this chapter excerpt to become an expert on adding PnP and non-PnP hardware. You'll also get tips on providing drivers for hardware, troubleshooting and removing hardware.
One of the tasks that is most common for anyone responsible for configuring and maintaining PCs is adding and removing hardware. The Control Panel contains an applet designed for that purpose, called Devices and Printers (accessible from want to make life easy for yourself, Control Panel's Hardware and Sound category). You can use it if the OS doesn't automatically recognize that you swiped something or added something new, whether it's a peripheral such as a printer or an internal device such as a DVD-ROM, additional hard disk, or whatever.
|
||||
If you're a hardware maven, you might visit Devices and Printers occasionally, but only if you work with non--Plug and Play (PnP) hardware. PnP hardware installation is usually effortless because Windows 7 is good at detection and should install items fairly automatically, along with any necessary device drivers that tell Windows how to access the new hardware. With non-PnP devices now nearly obsolete, you'll only need to mess with this on rare occasions, if at all.
If you've purchased a board or other hardware add-in, you should first read the supplied manual for details about installation procedures. Installation tips and an install program may be supplied with the hardware. However, if no instructions are included, keep reading to find out how to physically install the hardware.
NOTE
Always check the installation instructions before you install the new hardware. In some cases, the instructions tell you to install some software before you install the new hardware. If they do, follow this advice! I have made the mistake of ignoring this and finding out that a driver has to be removed and reinstalled in the correct order to work correctly.
If you're installing an internal device, you'll have to shut down your computer before you open the case. I suggest that you also unplug it because most modern PCs actually keep part of the system powered up even when it appears to be off. Before inserting a card, you should discharge any potential electrostatic charge differential between you and the computer by touching the chassis of the computer with your hand. Using an antistatic wrist strap also is a good idea. Then insert the card, RAM, and so on.
When the device is installed, power your PC back up, log on with a Computer Administrator account, and wait a minute or so. In most cases, the Add Hardware Wizard automatically detects and sets up the new device. If you must run this wizard, type hdwwiz in the Start menu search box (it's no longer listed in Control Panel).
TIP
You might be tempted to move some adapter cards plugged in to your motherboard from one slot to another, but don't do this unless you really must. Each PCI adapter's configuration information is tied to the slot into which it's plugged. When you restart your computer, the PnP system will interpret the move as your having removed an existing device and installed a new one, and this can cause headaches. In some cases, you'll even be asked to reinsert the driver disks for the device you moved, and you may have to reconfigure its software settings. (From personal experience, I can tell you that moving a modem gives Symantec PCAnywhere fits.) If you must swap slots, don't change or mess with them all at once. Change one and reboot, and then change another. Windows 7 is better about contention and remapping resources than previous Windows versions were.
If you're adding a USB or FireWire device, plugging in an Ethernet cable, or a digital camera card, you don't need to shut down before plugging in or inserting the new device, but you should close any programs you have running, just in case the installation process hangs the computer. The computer itself (as opposed to applications) doesn't hang often in NT-based systems such as XP, Vista, and Windows 7, so BSODs (blue screens of death) are more rare, but they can happen. Save your work and close your applications before you plug in the new device.
For non-PnP hardware, or for PnP stuff that isn't detected or doesn't install automatically for some reason, you can try this:
1. Type hdwwiz in the Start menu search box to launch the Add Hardware Wizard.
2. The wizard starts by advising you to use a CD if one came with your hardware. This is good advice. If you don't have a CD, you can move ahead and use the wizard.
3. Click Next, and the wizard asks whether you want it to search for the new hardware and figure out what it is (and try to find a driver for it), or whether you want to specify it yourself. Go for the search. If you're lucky, it will work, and you're home free. If a new device is found that doesn't require any user configuration, a help balloon appears onscreen near the system tray, supplying the details of what was located.
TIP
Another way to force a scan of legacy hardware is to open the Device Manager, right-click the computer name at the top of the list, and choose Add Legacy Hardware.
4. If nothing is found, the wizard asks you to manually select the hardware you wish to install from a list. Assuming you know what to choose, click Next. You'll now see a list like the one in
5. Choose the correct category and click Next. Depending on the item, you'll next see a different dialog box. For example, for a modem, the wizard offers an option to detect and install it. For most other items, it prompts you for the make and model.
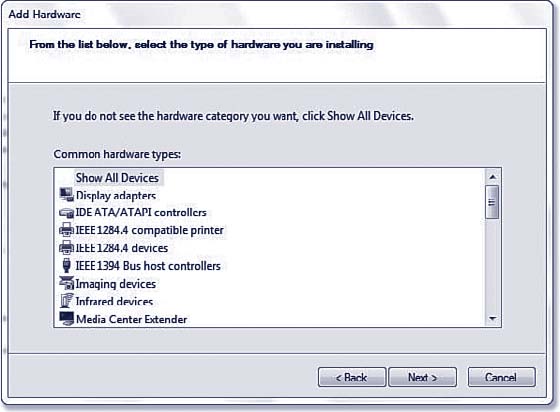
Figure 27.2
When a new PnP device isn't found, you see this dialog box. Choose the right category and click Next.
6. Choose the correct make and model. If you don't see a category that matches your hardware, click Back and then select Show All Devices. It will take a minute for the list to be populated. The box will then show every manufacturer and the devices each manufacturer sells. With some sleuthing, you may be able to find the hardware you wish to install.
NOTE
Windows 7 64-bit cannot use legacy hardware as XP, Vista, and 32-bitWindows 7 can. All 64-bit drivers must be digitally signed by Microsoft, or they are not allowed to install.
Be sure you choose the exact name and model number/name for the item you're installing. You might be prompted to insert your Windows 7 DVD so that the appropriate driver file(s) can be loaded. If your hardware came with a driver disk, use the Have Disk button to install the driver directly from the manufacturer's driver disk or downloaded file.
TIP
In some cases, you can adjust settings after hardware is installed and possibly adjust the hardware to match. (Some legacy cards have switches or software adjustments that can be made to them to control the I/O port, DMA address, and so forth.) You might be told which settings to use to avoid conflicts with other hardware in the system. If, for some reason, you don't want to use the settings that the wizard suggests, you can use your own settings and configure them manually. You can do so from the Add Hardware Wizard or via the Device Manager. See Chapter 22 for details on adjusting hardware resources and dealing with resource contention. This is much less of a problem than it once was, now that virtually all modern PC hardware conforms to the Plug and Play spec.
Early in the wizard's steps, you can specify the hardware and skip the legacy scan. This option saves time and, in some cases, is a surer path to installing new hardware. It also lets you install a device later if you want to. The wizard doesn't bother to authenticate the existence of the hardware; it simply installs a new driver.
If a device plugs in to an external serial, parallel, or SCSI port, you might want to connect it, turn it on, and restart your system to install it. Some of these devices can't be installed via the Add Hardware Wizard if they're not present when the system starts up.
As mentioned previously, you can also use the Devices and Printers applet to install hardware. To add a network or wireless device of some kind, for example, click Start, Devices and Printers, and then click Add a Device. This triggers a device scan on your PC, and if Windows 7 finds something suitable, it will trigger the device installation at that point. Likewise, to add a printer you can click Add a Printer at the end of the preceding sequence. Then you will see options to add a locally or network-attached print device instead. After that, you'll install any necessary drivers and the process will complete.
TIP
Use the System applet or the Computer Management Device Manager Console, not the Add Hardware Wizard, to fine-tune device settings, such as IRQ and port selections, update devices and drivers, and remove hardware. Use the Add Hardware Wizard only to add or troubleshoot hardware.
Here's a quick way to access Device Manager: Click Start, type Device into the search box, and then select Device Manager from the results list. That's it!
Providing Drivers for Hardware Not in the List
If the hardware you're attempting to install isn't on the device list, this might be because one or more of the following is true:
• The hardware is newer than Windows 7 itself.
• The hardware is old, and Microsoft did not include its driver.
• The hardware must be configured using a special setup program supplied with the device.
In such cases, you must obtain a driver from the manufacturer's website (or Microsoft's; check both) and have it at hand in some form (UFD, optical media, or on a hard drive somewhere accessible). If the manufacturer supplies a setup disk, forget my advice, and follow the manufacturer's instructions. However, if the manufacturer supplies a driver disk and no instructions, follow these steps:
1. Run the Add Hardware Wizard and click Next.
2. Select Install the Hardware That I Manually Select from a List and click Next.
3. Select the appropriate device category and click Next.
4. Click the Have Disk button. Enter the location of the driver. (You can enter any path, such as a local directory or a net-tipwork path.) Typically, you insert a UFD or optical disk. If you do use the Browse option, look for a directory where an INF file appears in the dialog box.
5. Assuming the wizard finds a suitable driver file, choose the desired hardware item from the ensuing dialog box and then follow the onscreen directions.
New Hardware Doesn't Work
If you've added some hardware but it doesn't work, try these troubleshooting steps, in this order:
1. Try the troubleshooters included in the Help system, assuming the hardware fits into one of the neatly packaged categories. Open them through the Help and Support page: Click Start, Help and Support, then type in the name or category for the device you're working with.
2. Try rebooting Windows 7.
3. Use System Information and the Device Manager to check resources assigned to the hardware to be sure there are no conflicts. Check the hardware manual to determine whether you should be setting DIP switches or jumpers to avoid conflicts if the device isn't PnP compatible.
4. Open the Device Manager, locate the device entry, and press the Delete key to delete it. Then, power down, remove the device, and restart Windows.
5. Power down again, reconnect the hardware (run the Add Hardware Wizard, also known as hdwwiz, if the hardware isn't detected at bootup), and configure as necessary.
6. Check Google; search to see if anyone else has posted about the problem and its solution.
7. Check the manufacturer's website. If it has a "Knowledge Base," search that.
8. If you purchased the hardware from a local store, contact it for assistance.
9. Contact the manufacturer via email or phone.
About Windows 7 Drivers
|
||||
Most Windows Vista drivers work in Windows 7, so if you can't find a driver specifically for Windows 7, try a Vista driver instead. Vista and Windows 7 use a common driver model, so this is perfectly safe most of the time. If a driver you load in Windows 7 crashes (for example, a graphics driver), it simply restarts (after the screen goes black temporarily). In a few moments, you're back up and running.
The user-mode driver model employed in Windows 7 and Vista is called the User-Mode Driver Framework (UMDF), and is part of Microsoft's newest driver model, the Windows Driver Foundation (WDF). A user-mode driver is typically used for devices that plug in to a USB or FireWire bus, such as digital cameras, PDAs, and mass storage devices. This also allows drivers that typically require a system reboot (video card drivers, for example) to install or update without forcing a reboot. For more about user-mode drivers, read https://en.wikipedia.org/wiki/User_Mode_Driver_Framework.
Not all Windows 7 drivers are installed in user mode. Some drivers do need to be installed in the kernel (this model is used in Windows XP and prior versions of Windows). For extra protection, to prevent flaky or bogus drivers from being installed into Windows 7, Microsoft is cracking down, but only for x64-based Windows 7 (that is, 64-bit) versions. Kernel-mode drivers on x64-bit versions of Windows 7 must be digitally signed, which means they have to be tested and given Microsoft's seal of approval. Even the Administrator account cannot install unsigned kernel-mode drivers. User-mode drivers may still be installed without a digital signature, however.
Removing Hardware
Before unplugging a USB, FireWire, or PCMCIA (PC Card) device, tell Windows 7 to stop using it. This prevents data loss caused by unplugging the device before Windows 7 has finished saving all its data. To stop these devices, click the Safely Remove Hardware icon (it's one of the hidden icons available through the up arrow in the notification area). Unplug the device or card only after Windows informs you it is safe to do so.
For the most part, you can remove other hardware simply by shutting your computer off, unplugging it, and removing the unwanted devices. When Windows restarts, it recognizes that the device is missing and can carry on without problems. As a shortcut when you don't want to power down completely, you can hibernate the computer and remove the item. Sometimes, this can prevent a computer from resuming properly though, so be cautious and save your work before you try this method. Test it, and if it works, you can disconnect this item during hibernation in the future, knowing that Windows 7 detects the change upon resuming.
If you want to completely delete a driver for an unneeded device, use the Device Manager. Double-click the device whose driver you wish to remove. This opens its properties dialog box. Click Uninstall Driver. Delete the drivers before uninstalling the hardware; otherwise, the device won't appear in the Device Manager's list of installed devices.
For details about the Device Manager, see "Device Manager," p. 612.
TIP
If a USB controller doesn't install properly, especially if the controller doesn't show up in the Device Manager, the problem might lie in your system BIOS. Most BIOSs include a setting to enable or disable USB ports. Shut down and restart. Do whatever your computer requires for you to check BIOS settings during system startup (usually pressing the Del or Esc key from the initial boot screen). Then, enter BIOS setup and enable USB support. When that is done, if a USB controller still doesn't appear in the Device Manager, it's possible the computer's BIOS might be outdated. Check with the computer or motherboard manufacturer for an update that supports USB under Windows 7.
![]()
![]() Installing and replacing Windows 7 hardware
Installing and replacing Windows 7 hardware
![]() Upgrading Windows 7 hardware for maximum performance
Upgrading Windows 7 hardware for maximum performance
![]() Adding and removing Windows 7 hardware
Adding and removing Windows 7 hardware
![]() Installing and troubleshooting multiple monitors for Windows 7
Installing and troubleshooting multiple monitors for Windows 7
![]() Installing, configuring and testing a UPS for Windows 7
Installing, configuring and testing a UPS for Windows 7
![]() How Windows 7 hardware upgrades affect licensing
How Windows 7 hardware upgrades affect licensing
Printed with permission from Que Publishing. Copyright 2009. Windows 7 In Depth by Robert Cowart and Brian Knittel. For more information about this title and other similar books, please visit Que Publishing.